VMware NSX is as a product of the Software Defined Data Centre (SDDC) which provides a network virtualization platform that uses micro-segmentation to define fine-grained security in the data center. Virtualization with NSX duplicates Layer 2 to Layer 7 of the Networking model which allows for complex and multiple tier network topologies setups in seconds. Fine-grained network controls and micro-segmentation capability offers unit level trust and flexible security policies that are applicable all the way to the network interface. Administrators can create custom combinations of these services in isolated software-based virtual networks and support existing applications without modifying or deliver unique requirements for new application workloads. In a physical network, this would require the deployment of a physical firewall in each workload. Micro-Segmentation has led to reduced cost and has been operationally infeasible.
Virtualized environments are increasingly becoming vulnerable to threats and attacks; therefore, there is need to use NSX for network micro-segmentation to enhance better traffic visibility. Our primary focus on this document shall be one of the VMware use case; Security with NSX.The article shall document how to enhance VMware security by configuring micro-segmentation with NSX.
Why Security with NSX?
- Micro-Segmentation: NSX makes micro-segmentation feasible by enabling granular firewalling and security policy enforcement for the workloads in the datacenter which is purely independent of the network topology and complexity.
- Secure End User: Micro-segmentation enables NSX to give each workstation its parameter and per application VPN access from mobile devices which eliminates unauthorized access to workloads.
- Demilitarized (DMZ) Anywhere: Advanced service is assigned dynamically to workloads independent of their underlying physical network that improves response time, overall security and third-party integration.
- Network Security inside the data center: The flexible security policies aligned to the virtual network, VM, OS type, security tag, and more, for granularity of security down to the virtual NIC.
- No More Hair pinning: Unlike traditional firewalling, that suffered from performance choke points, this is exacerbated by NSX as there is increased traffic hence avoiding blind service spots.
Micro-segmentation reduces risk levels and increases security posture by allowing reasonable security policies to travel with virtual workloads, independent of the underlying physical network topology.
STILL SPENDING TIME ON SUPPORT?
Outsource your helpdesk support to save time and money. We have technicians available for little over 5 USD per hour in order to assist your customers with their technical questions. Grow your business and concentrate more on your SALES!
Xieles Support is a provider of reliable and affordable internet services, consisting of Outsourced 24×7 Technical Support, Remote Server Administration, Server Security, Linux Server Management, Windows Server Management and Helpdesk Management to Web Hosting companies, Data centers and ISPs around the world. We are experts in Linux and Windows Server Administration, Advanced Server Security, Server Security Hardening. Our primary focus is on absolute client satisfaction through sustainable pricing, proactively managed services, investment in hosting infrastructure and renowned customer support.
Steps to Configure Micro-segmentation
Step by step includes how to
- configure NSX Manager
- integrating it with your vCentre
- creating security groups
- creating security policies
- setting them to map your virtual environment
Configuring NSX Manager
1. At the vCentre Home Screen click Hosts and Clusters.
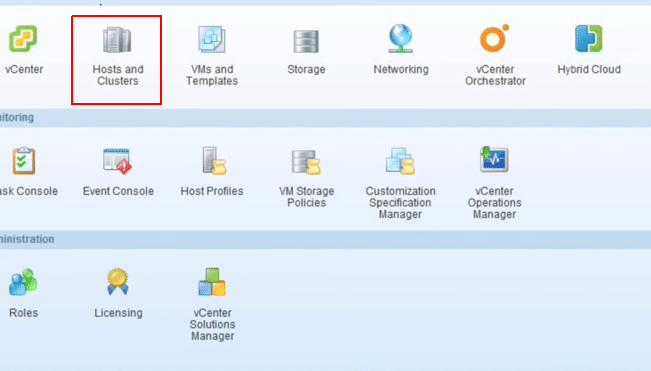
Fig 1: vCentre Home Screen
2. Right-click on the selected Datacenter and then choose Deploy OVF Template. You can download NSX Manager from my.vmware.com
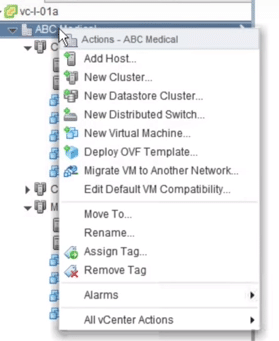
Fig 2: Datacentre: Deploying OVF
3. Select the NSX Manager OVA source location then click Next; you can browse to your download location.
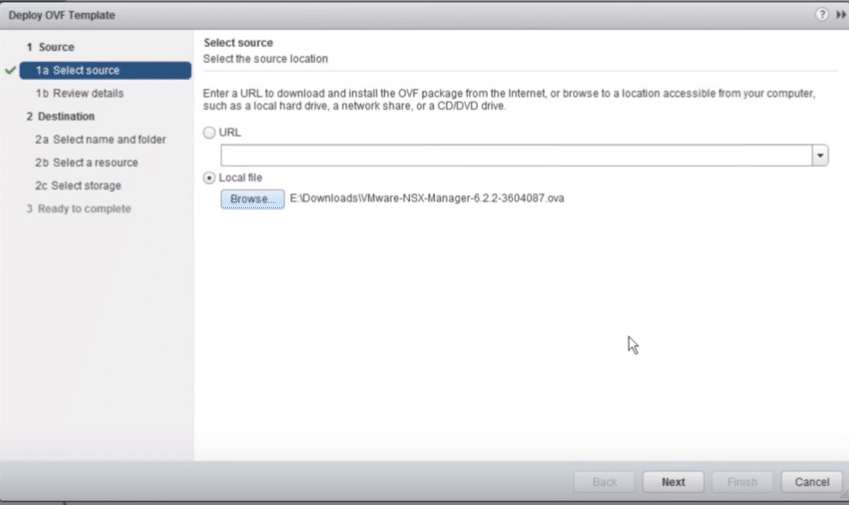
Fig 3: Select OVF file source
4. Mark Accept extra configuration options, allows for NSX manager customization of network parameters, then click Next.
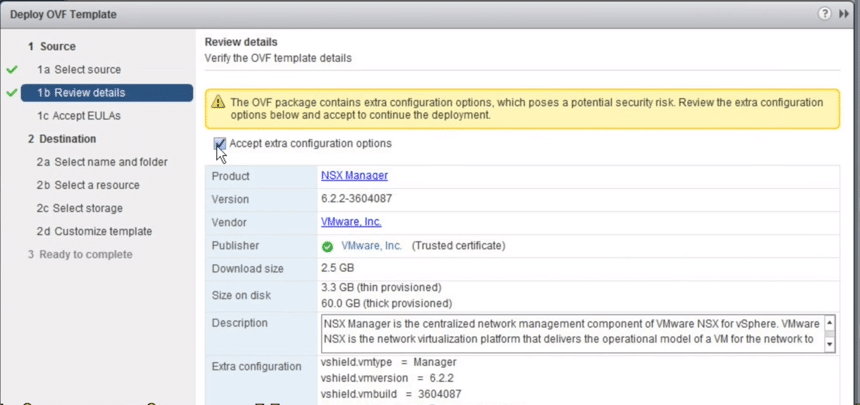
Fig 4: Review Details
5. Read the terms and conditions and Accept then click Next.
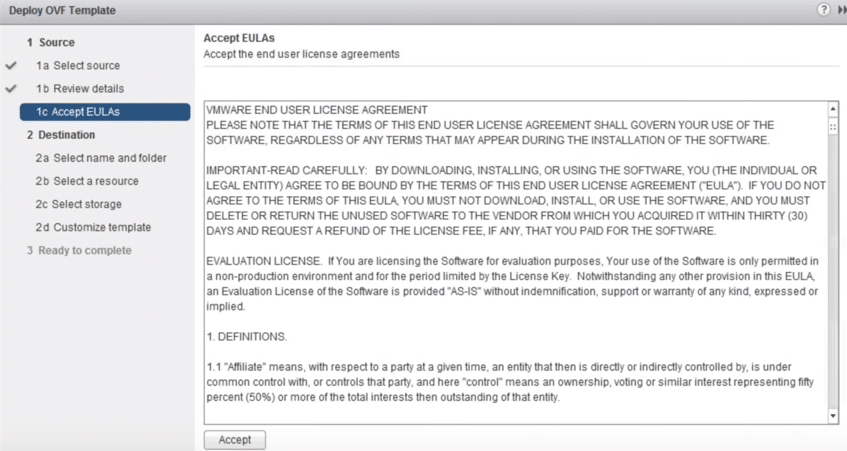
Fig 5: Accept Terms and Conditions
6. Give the appropriate Name the NSX Manager and select the proper Datacenter you would like it to be placed then click Next.
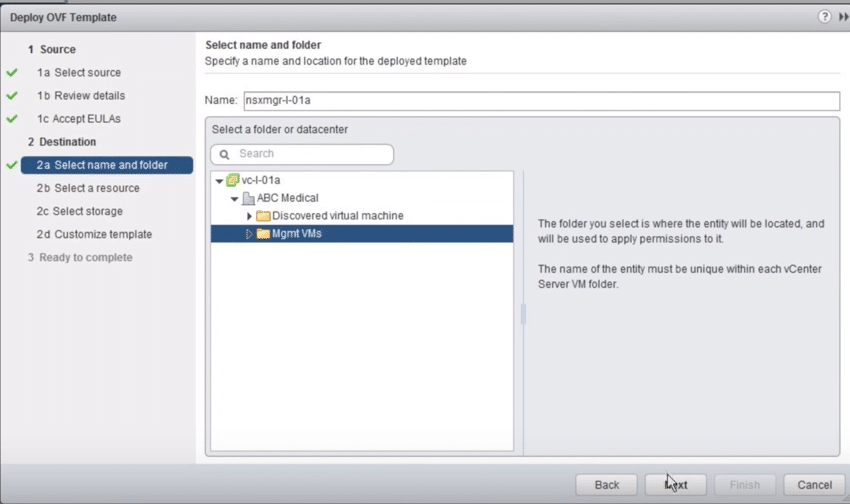
Fig 6: NSX Manager Name and Datacenter
7. Select the cluster or the resource pool and deploy, wait until it validates then click Next.
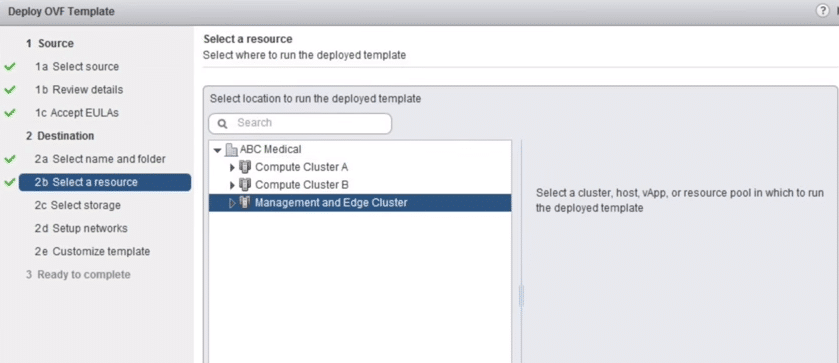
Fig 7: Resource pool
8. Select the virtual disk format and data store storage location.
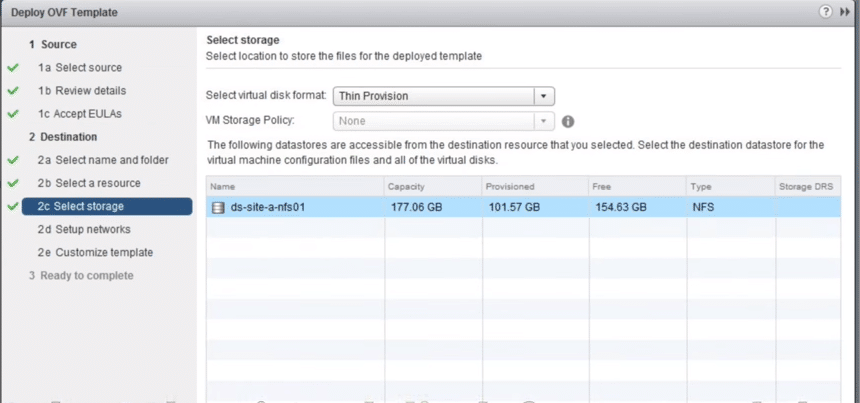
Fig 8: Select Storage
9. Select the dvPG where the management vNIC is connected, then Click Next.
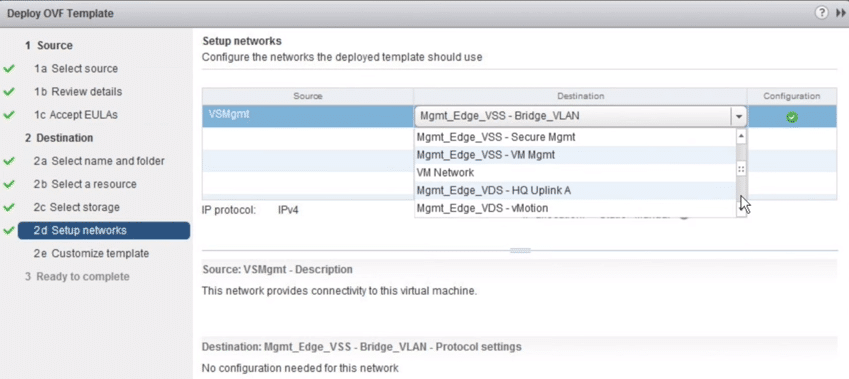
Fig 9: Setup Network
10. Set the NSX Manager Password
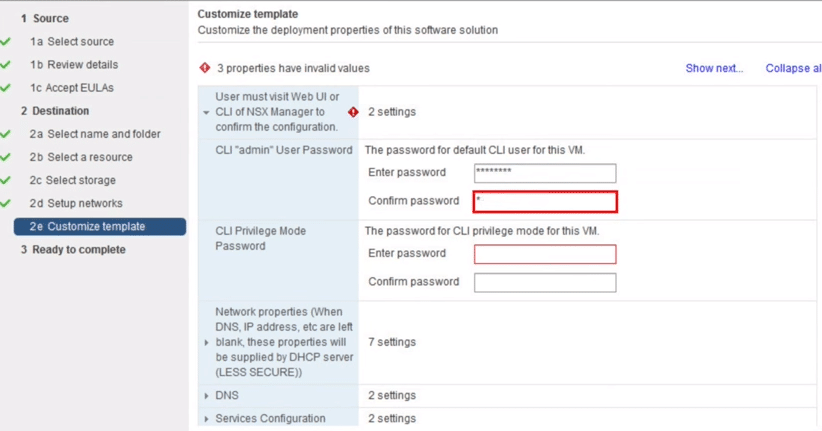
Fig 10: Customize Template
11. Set the hostname FQDN, IP address, subnet mask and default gateway.

Fig 11: Customize Template
12. Set the DNS Server and Domain search list, Set NTP Server, Enable SSH Management if needed then click Next.
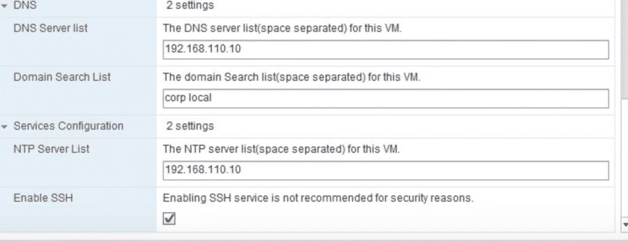
Fig 12: Customize Template
13. Review the NSX Settings, then Mark power on after deployment checklist then click Finish.
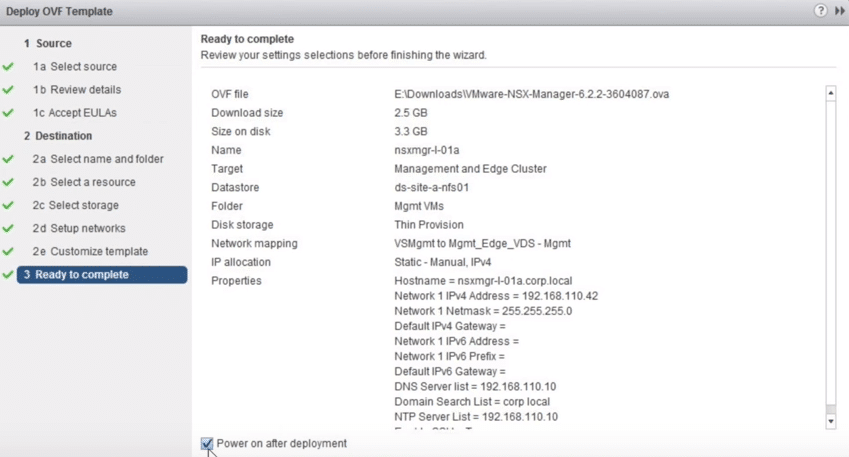
Fig 13: Complete Setup
14. You can monitor it at the recent tab as it initializes. Green check mark upon completion indicates it worked as expected.
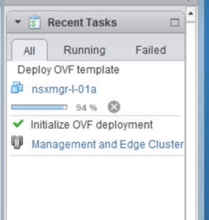
Fig 14: Recent Tasks
vCenter integration with NSX
1. vCenter integration happens through NSX Manager Web Interface Management. Log in to VMware NSX Manager Virtual Appliance using the admin credentials that you just configured.
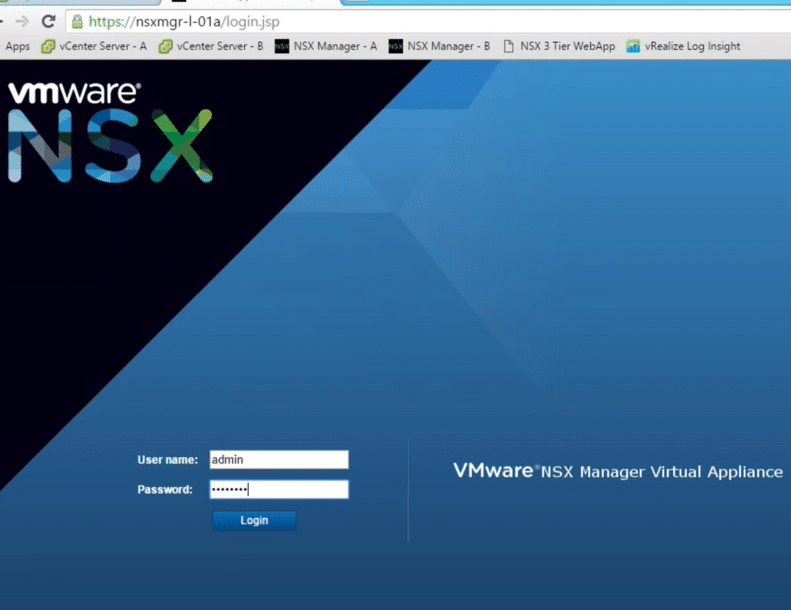
Fig 15: NSX Manager Login Interface
2. At NSX Manager Home Page click Manage vCenter registration.
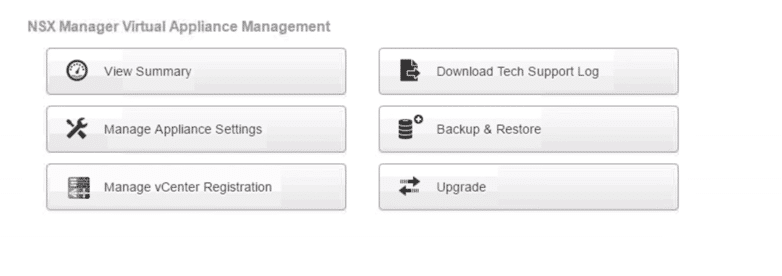
Fig 16: NSX Manager Virtual Appliance Management Window
3. Click Edit button at the top to configure the Lookup Services.
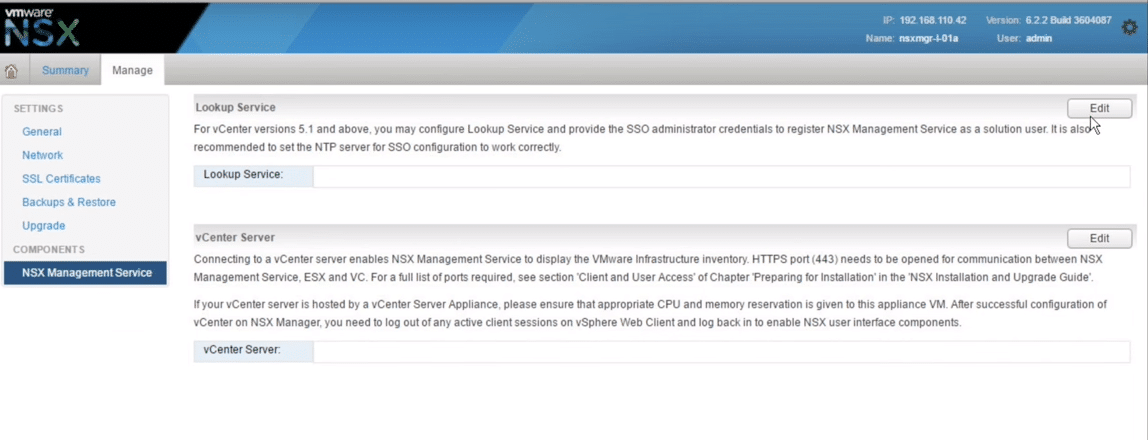
Fig 17: NSX Manager Window
4. At the lookup services, input the PSC IP address or FQDN set the lookup service port, which is usually by default 7444 for vSphere 5.5 and 443 for vSphere 6.0, then provide the admin credentials.
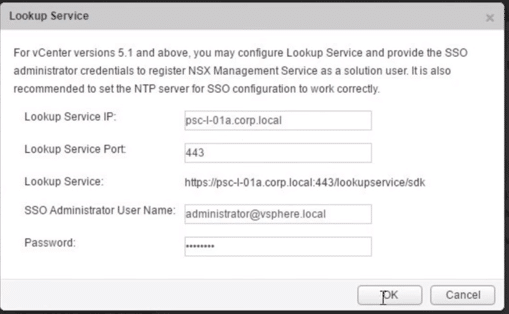
Fig 18: Lookup Services
5. SSL Fingerprint is displayed, proceed by clicking Yes.
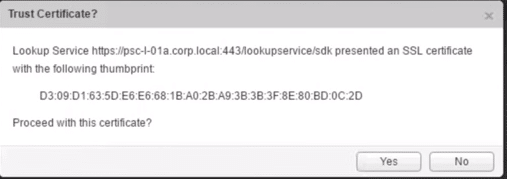
Fig 19: Trust Certificate
6. We then proceed to vCentre Registration click Edit button on the bottom
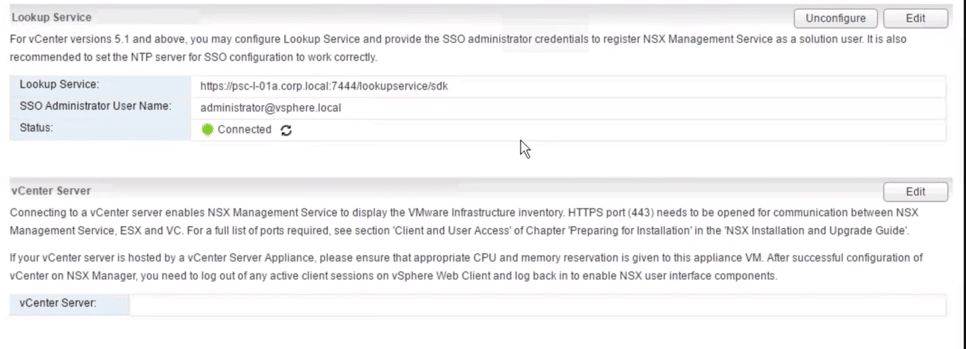
Fig 20: Lookup Services
7. Provide vCentre IP address of FQDN and the admin credentials.
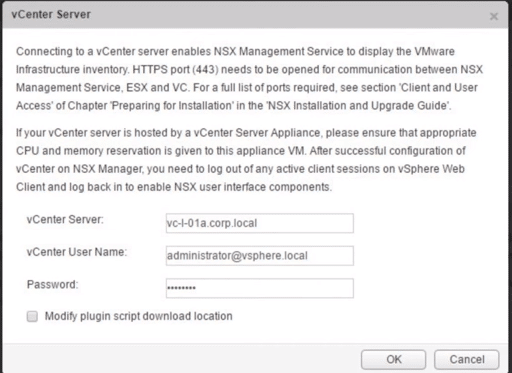
Fig 21
8. Review SSL Information and click Yes

Fig 22
9. The connection with a green status indicates integration success
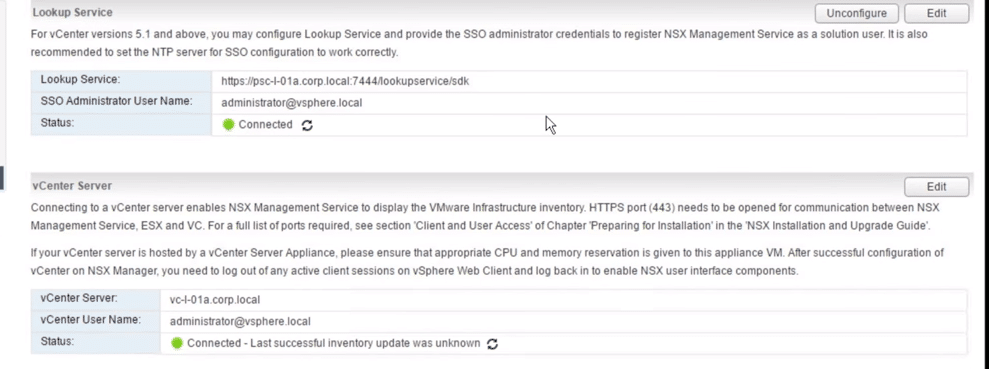
Fig 23: Lookup Services
You can review your settings (General, Network) at any time from the Manage tab in the VMware NSX web interface management window
10. Log off the NSX Web interface management window (click on dark grey gear at the bottom of the window).
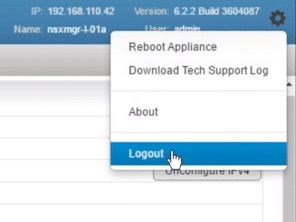
Fig 24
11. Login to vCentre Web client as an administrator
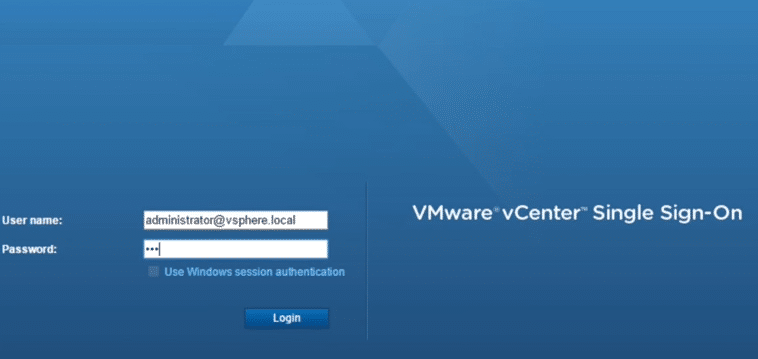
Fig 25
12. If all configurations are correct, NSX Network and security button is displayed the vCentre Inventories.
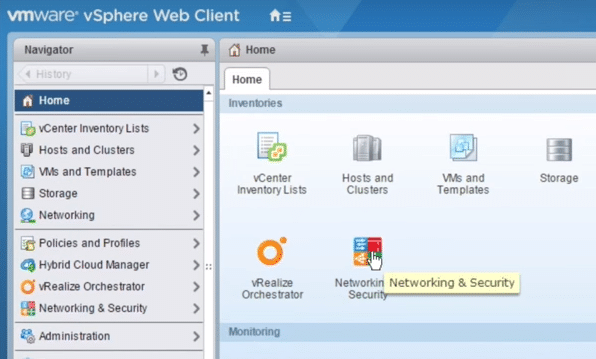
Fig 26
13. You can license by clicking Administration, then licenses, then click the green plus sign to add the new license
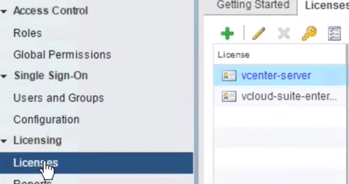
Fig 27
Paste the key
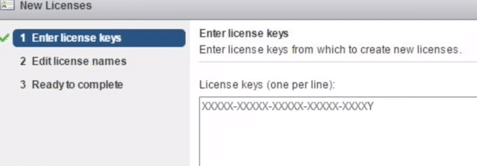
Fig 28: License key registration
Then assign it to the solutions tab.
Creating Security Groups and Policies in NSX
1. In VMware vSphere Web Client portal, select Networking & Security
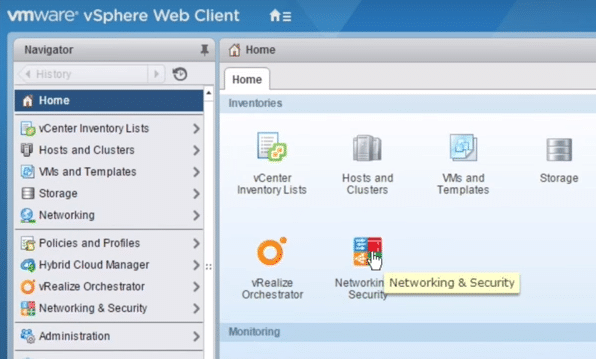
Fig 29: Network and security
2. Under Service Composer navigate to Security Groups tab, then click Add new Security Group button.
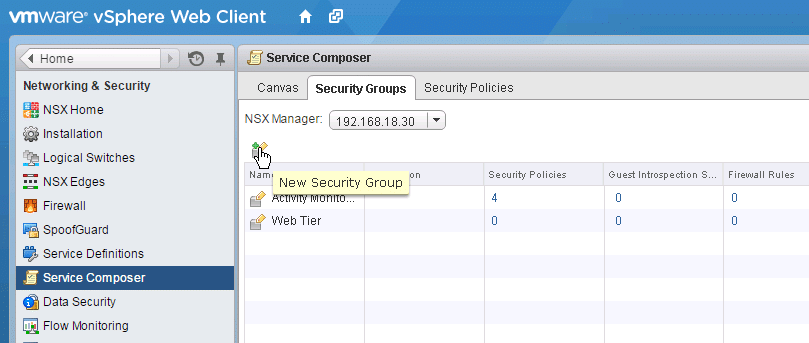
Fig 30: Security groups
3. Allocate an appropriate Name and Description, then click Next
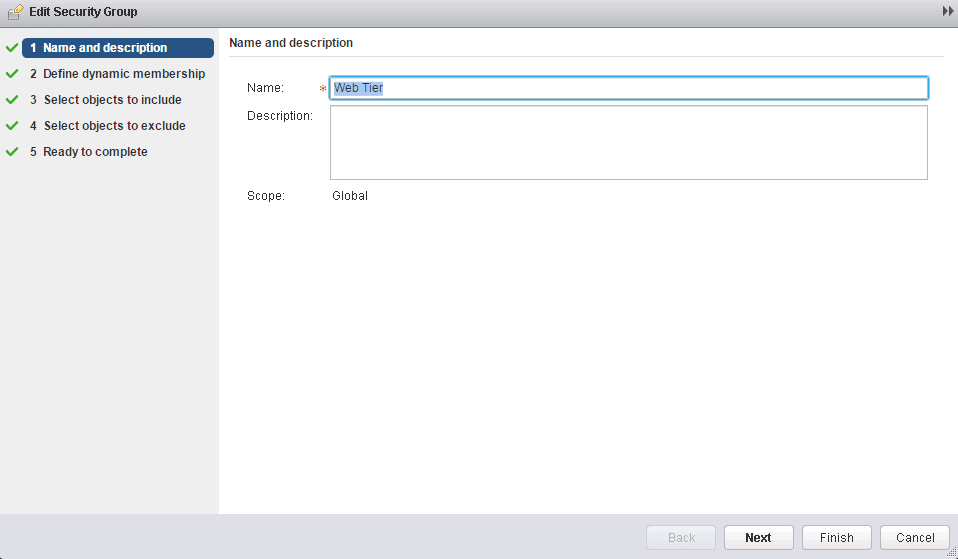
Fig 31: Security groups
4. Specify membership criteria.
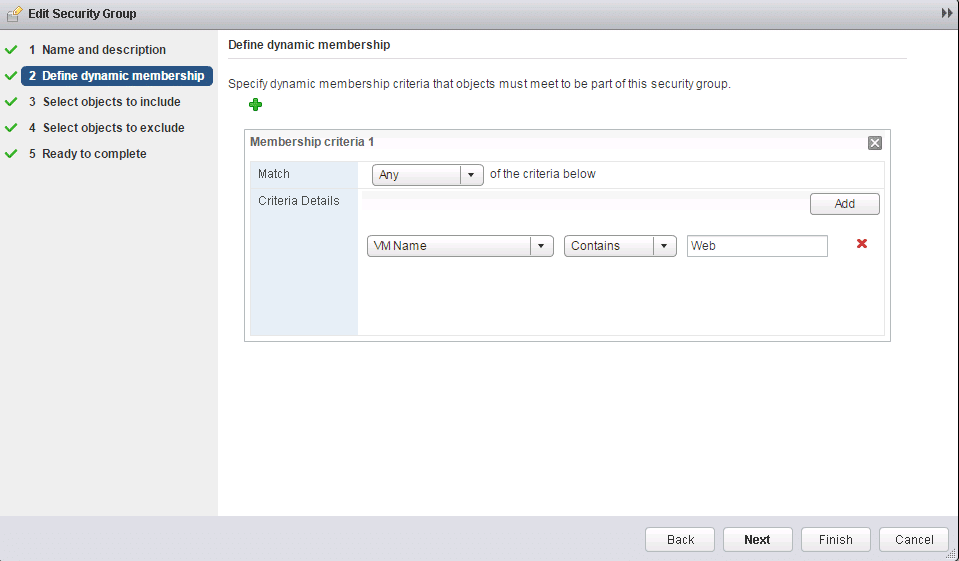
Fig 32: Membership criteria
Select objects to include, e.g., Virtual Machine, Cluster, Datacenter within the VMware environment.
5. Specify any additional Objects to include, i.e., security tags, resource pools, cluster then click Next then Select-Object to Exclude
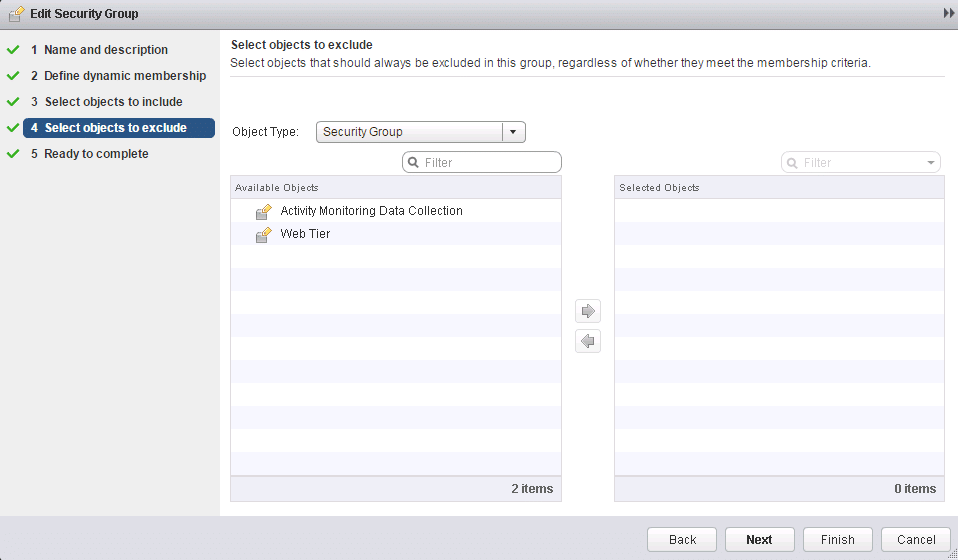
Fig 33: Additional objects
6. Click Finish.
7. Depending on criteria preferences, you can confirm your preferred Guest Introspection Services, Firewall Rules, Security Policies, Virtual Machines are in your security group.
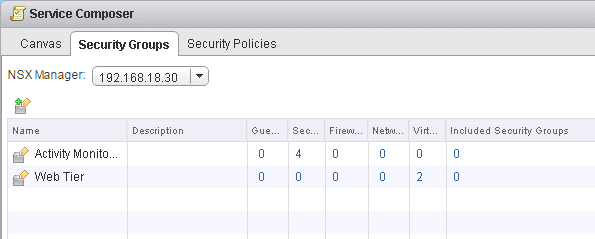
Fig 34: Service composer
Creating Security Policies
The security policy refers to a grouping of security and network services, i.e., Network introspection services, Endpoint services or Distributed Firewall Rules. Follow the below steps to create a security policy:
1. Select create Security Policy tab as below.
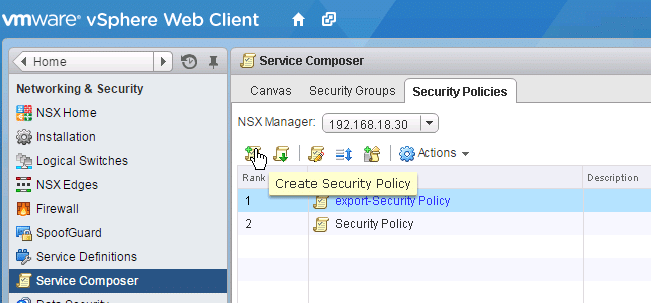
Fig 35: Service composer
2. Specify name and description, then click Next
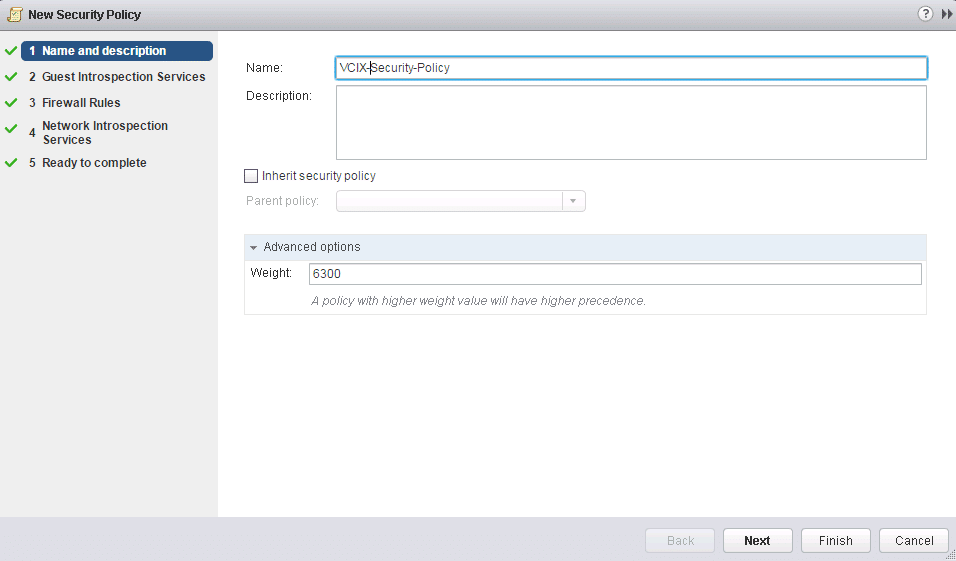
Fig 36: Security policy
3. Specify the Guest Introspection Services that you intend to add to the security policy then click Next
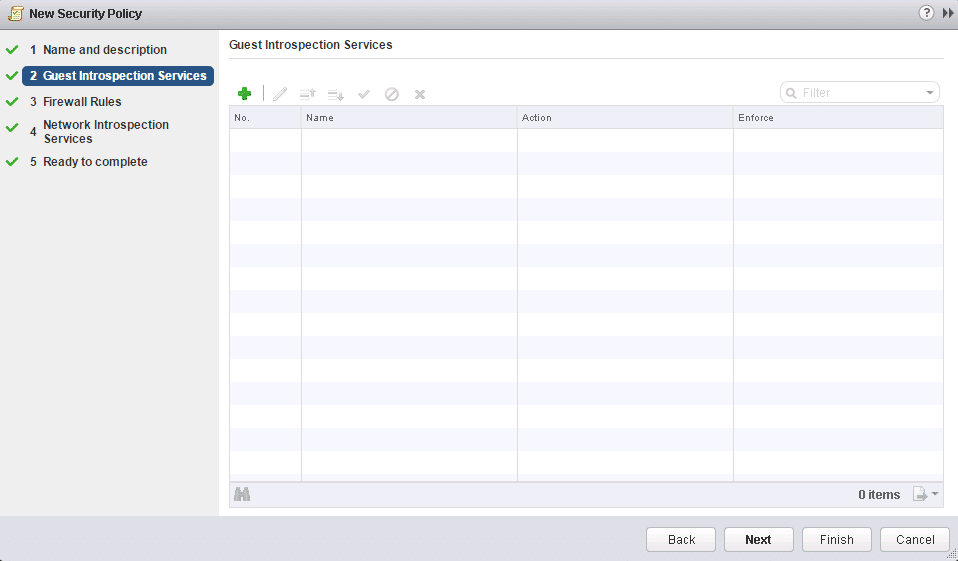
Fig 37: Guest Introspection
4. Add the required Firewall Rules that you would like to associate with the Security Policy then click Next
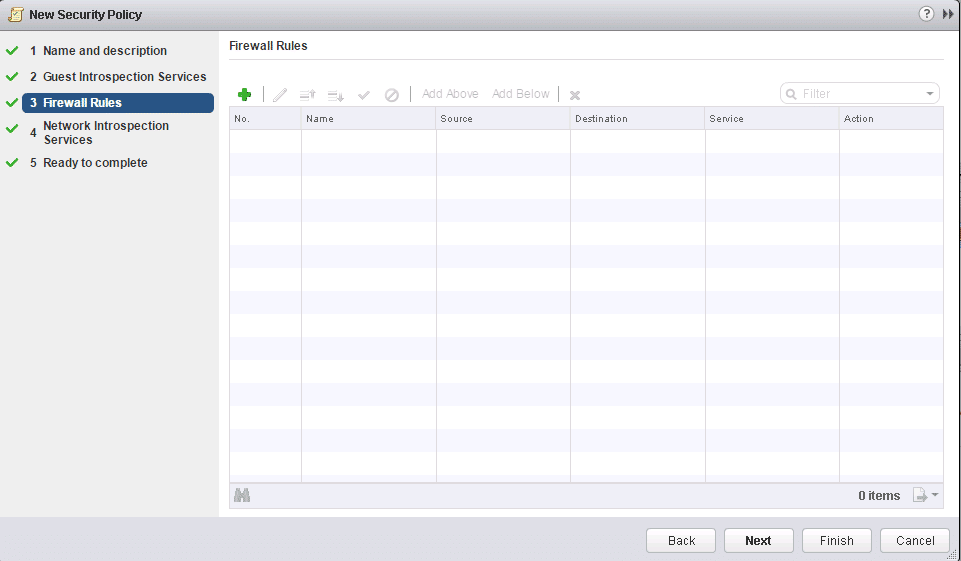
Fig 38: Firewall rules
5. Specify Network Introspection Services to associate with the security policy and click Next
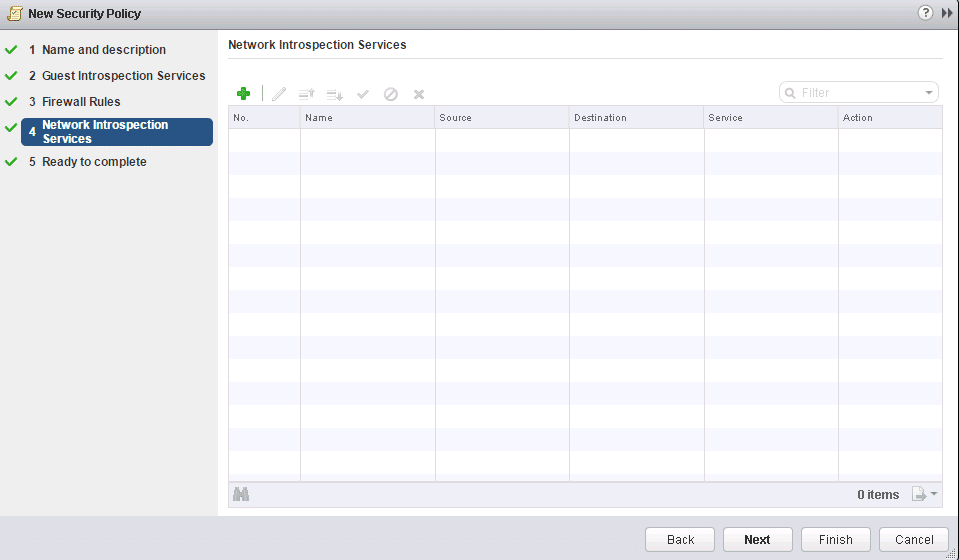
Fig 39: Network introspection.
6. Confirm your settings, then click Finish.
Map the security policies to the Security Groups.
1. Right Click on your Security Policy then select Apply Policy
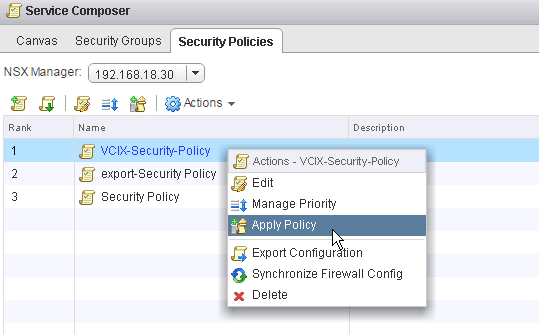
Fig 40: Security policies
2. Check the Security Group(s) for which you would like to apply the Security Policy then click OK.
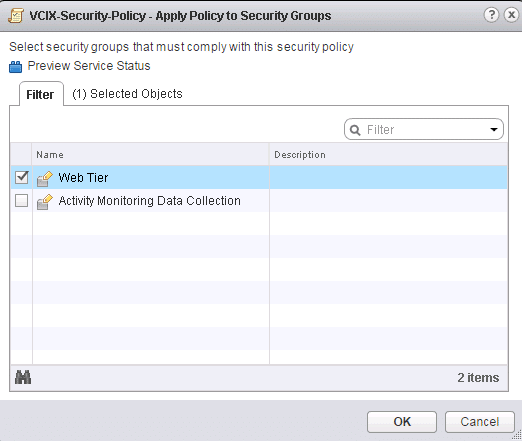
Fig 41: VCIX security policy
Conclusion
The landscape of modern data center is rapidly evolving. Virtualization, cloud, and software-defined services have therefore spearheaded the modernization of the data center and service efficiency without compromise. This modernization drives the need to evolve security solutions from static, models to dynamic, policy-driven, granular, flexible models as traditional network techniques are not scalable into the future. NSX with Micro-segmentation enables a fundamental architectural shift, making networked applications safe, now and into the future hence building a firm foundation that secures the modern data center.


