
Android is a Linux based Operating System with java programming interface primarily designed for smartphones and tablets. Android was initially developed by Android, Inc., and was purchased by Google in 2005. The applications for android can be downloaded from Google Play, Android’s primary app store.
Android Versions
The different android versions with API level and code names.
|
Version |
Code Name |
API Level |
|
4.2.x |
Jelly Bean |
17 |
|
4.1.x |
Jelly Bean |
16 |
|
4.0.x |
Ice Cream Sandwich |
15 |
|
3.2 |
Honey Comb |
13 |
|
3.1 |
Honey Comb |
12 |
|
2.3.3 – 2.3.7 |
Ginger Bread |
10 |
|
2.3 – 2.3.2 |
Ginger Bread |
9 |
|
2.2 |
Froyo |
8 |
|
2.0 – 2.1 |
Eclair |
7 |
|
1.6 |
Donut |
4 |
How To Enable Your System for Android Application Development ?
The tools required for Android application development can be obtained and installed free. The installation process:
- Install latest version of Java.
- If you dont have Eclipse installed in your system, install Eclipse IDE for Java developers.
- Download Android SDK for your platform(Windows/Linux/Mac OS X).
- Extract the the downloaded file to somewhere in your hard disk.
- Run Eclipse and choose Help->Install New Software.
- Click Add in the new pop up window.
- Enter Android Development Tools in the Name field and https://dl-ssl.google.com/android/eclipse/ in the Location field.
- Click Next and Finish to install the plugin. You’ll need to restart Eclipse once everything is installed.
- When Eclipse restarts, choose Window->Preferences and you should see Android listed in the categories.
- You now need to tell Eclipse where you’ve installed the Android SDK. Click Android and then Browse to select the location where you extracted the SDK files.
- Click OK to have Eclipse save the location of your SDK.
How to start Android application development ?
To start writing Android applications, you need to download SDK platforms for the android devices.
- Choose Window->Android SDK Manager in Eclipse.
- Click Available Packages in the left column and check the repository to show a list of the available Android platforms.
- You can choose which platforms to download from the list. When you’re done, click Install Selected and follow the installation instructions.
Creating new Android Application
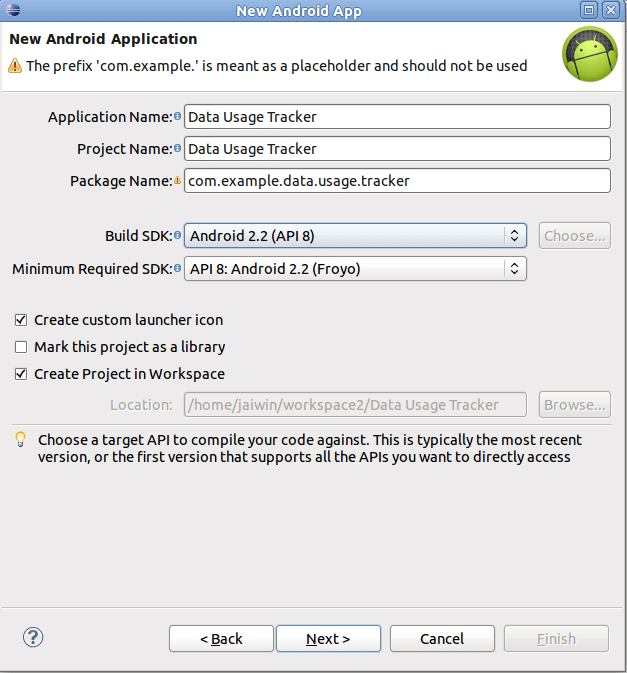
New project wizard in Eclipse will let you create a new android project. Let’s create a new Android application ‘Data Usage Tracker’. This application will display the internet connection state, network signal level and the data usage information in bytes. To start creating a new application :
- Choose File->New->Project.

- Select Android Application Project.
- In the New Android Application dialog, enter the following as shown in picture below.
- Click Next and choose an icon from Configure Launcher Icon dialog box.
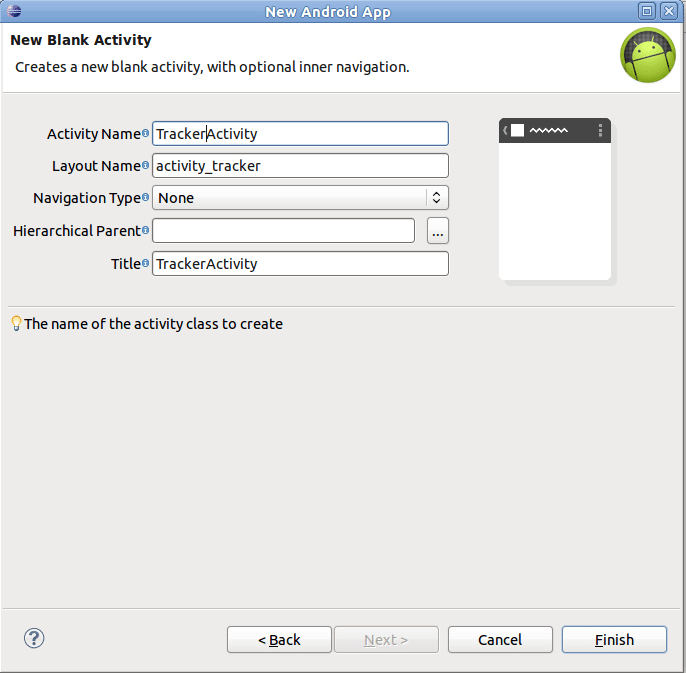
- Click Next. From the Create Activity dialog box, select Blank Activity and click Next.
- In the New Blank Activity dialog box, enter the following as shown in picture below.
- When you are done click Finish. A new Android Project created in your workspace.
The Coding Part of Data Usage Tracker
Now open AndroidManifest.xml in Eclipse by double clicking it in package explorer, and add the following lines in it.
<uses-permission android:name=”android.permission.ACCESS_NETWORK_STATE”/>
<uses-permission android:name=”android.permission.CHANGE_NETWORK_STATE”/>
<uses-permission android:name=”android.permission.READ_PHONE_STATE”/>
<uses-permission android:name=”android.permission.ACCESS_COARSE_UPDATES”/>
These are the permissions to access above features from Android System by ‘Data Usage Tracker’.
Next, you are going to create the user interface or layout for ‘Data usage Tracker’. The user interfaces are created as XML files. The layout file are generally stored in res/layout folder. The Eclipse allows us to create the layout in graphical mode by dragging and dropping controls. It’s easier to write the interface in XML file.
- Open res/layout/activity_tracker.xml in Eclipse.
- Now change the content of activity_tracker.xml to:
<RelativeLayoutxmlns:android=“http://schemas.android.com/apk/res/android”
xmlns:tools=“http://schemas.android.com/tools”
android:layout_width=“match_parent”
android:background=“#000000”
android:layout_height=“match_parent” >
<TextView
android:id=“@+id/textView1”
android:layout_width=“wrap_content”
android:layout_height=“wrap_content”
android:layout_alignParentLeft=“true”
android:textColor=“#FFFFFF”
android:layout_alignParentTop=“true”
android:layout_marginTop=“22dp”
android:text=“ConnectionState:” />
<TextView
android:id=“@+id/connectionStateInfo”
android:layout_width=“wrap_content”
android:textColor=“#FFFFFF”
android:layout_height=“wrap_content”
android:layout_alignBaseline=“@+id/textView1”
android:layout_alignBottom=“@+id/textView1”
android:layout_centerHorizontal=“true”/>
<TextView
android:id=“@+id/textView2”
android:layout_width=“wrap_content”
android:textColor=“#FFFFFF”
android:layout_height=“wrap_content”
android:layout_alignParentLeft=“true”
android:layout_below=“@+id/textView1”
android:layout_marginTop=“26dp”
android:text=“SignalLevel:” />
<TextView
android:id=“@+id/dataUsageInfo”
android:layout_width=“fill_parent”
android:textColor=“#FFFFFF”
android:layout_height=“wrap_content”
android:layout_alignParentLeft=“true”
android:layout_below=“@+id/textView2”
android:layout_marginTop=“35dp” />
<TextView
android:id=“@+id/signalLevelInfo”
android:layout_width=“wrap_content”
android:textColor=“#FFFFFF”
android:layout_height=“wrap_content”
android:layout_above=“@+id/dataUsageInfo”
android:layout_toRightOf=“@+id/connectionStateInfo”
android:textAppearance=“?android:attr/textAppearanceSmall” />
<ProgressBar
android:id=“@+id/signalLevel”
style=“?android:attr/progressBarStyleHorizontal”
android:layout_width=“wrap_content”
android:max=“100”
android:progress=“15”
android:indeterminateOnly=“false”
android:layout_height=“wrap_content”
android:layout_alignBottom=“@+id/signalLevelInfo”
android:layout_alignLeft=“@+id/connectionStateInfo” />
</RelativeLayout>
Now it’s the time to work with interface using the java code. The java files resides in src/<package name> folder. Now open the src/com.example.data.usage/TrackerActivity.java. When you open this file, you can see onCreate() method. This is the method that gets called first whenever you run your application. Let’s change the onCreate() method of application.
public class TrackerActivity extends Activity {
private static final int EXCELLENT_LEVEL = 75;
private static final int GOOD_LEVEL = 50;
private static final int MODERATE_LEVEL = 25;
private static final int WEAK_LEVEL = 0;
@Override
public void onCreate(Bundle savedInstanceState) {
super.onCreate(savedInstanceState);
setContentView(R.layout.activity_tracker);
startSignalLevelListener();
dataUsageInfo();
}
}
The R.layout.activity_tracker calls xml file and decodes it. Now you need to write the code for startSignalLevelListener() method. In this method you access TELEPHPONY_SERVICE using getSystemService(TELEPHONY_SERVICE) and starts the listener for phone state change.
private void startSignalLevelListener() {
TelephonyManager tm = (TelephonyManager) getSystemService(TELEPHONY_SERVICE);
int events = PhoneStateListener.LISTEN_SIGNAL_STRENGTH |
PhoneStateListener.LISTEN_DATA_CONNECTION_STATE ;
tm.listen(phoneStateListener, events);
}
Now you need to write the code for phoneStateListener. The phoneStateListener listens for internet connection state change and displays the internet connection state in a TextView that you defined in XML file. It will also listen for network signal strength change.
private final PhoneStateListener phoneStateListener = new PhoneStateListener() {
@Override
public void onDataConnectionStateChanged(int state) {
String connectionState = “Unknown”;
switch(state) {
case TelephonyManager.DATA_CONNECTED: connectionState = “Connected”; break;
case TelephonyManager.DATA_CONNECTING: connectionState = “Connecting”; break;
case TelephonyManager.DATA_DISCONNECTED: connectionState = “Disconnected”; break;
case TelephonyManager.DATA_SUSPENDED: connectionState = “Suspended”; break;
default: connectionState = “Unknown: “ + state; break;
}
((TextView)findViewById(R.id.connectionStateInfo)).setText(connectionState);
super.onDataConnectionStateChanged(state);
}
@Override
publicvoid onSignalStrengthChanged(int asu) {
setSignalLevel(asu);
dataUsageInfo();
super.onSignalStrengthChanged(asu);
}
};
Now you need to write the code for setSignalLevel() and dataUsageInfo() methods. This methods will display the signal level status and data usage information in the screen.
private void setSignalLevel(int level) {
int progress = (int) ((((float)level)/31.0) * 100);
String signalLevelString = getSignalLevelString(progress);
((ProgressBar)findViewById(R.id.signalLevel)).setProgress(progress);
((TextView)findViewById(R.id.signalLevelInfo)).setText(signalLevelString);
}
private String getSignalLevelString(int level) {
String signalLevelString = “Weak”;
if(level > EXCELLENT_LEVEL) {
signalLevelString = “Excellent”;
}
elseif(level > GOOD_LEVEL) {
signalLevelString = “Good”;
}
elseif(level > MODERATE_LEVEL) {
signalLevelString = “Moderate”;
}
elseif(level > WEAK_LEVEL) {
signalLevelString = “Weak”;
}
return signalLevelString;
}
public void dataUsageInfo() {
String info = “”;
info += “\nMobile Interface:\n”;
info += (“\tReceived: “ + TrafficStats.getMobileRxBytes() + ” bytes \n”);
info += (“\tTransmitted: “ + TrafficStats.getMobileTxBytes() + ” bytes\n”);
info += “\nAll Network Interface:\n”;
info += (“\tReceived: “ + TrafficStats.getTotalRxBytes() + ” bytes \n”);
info += (“\tTransmitted: “ + TrafficStats.getTotalTxBytes() + ” bytes “);
((TextView)findViewById(R.id.dataUsageInfo)).setText(info);
}
Now you can define onPause(), onResume() and onDestroy() methods. OnPause() method is called when you press the back button or home button. OnResume() method is called when you return to the application. OnDestroy() method is called when you exit from the application. When you are not using the listener, you have to free the listener for other applications using stopListening() function.
@Override
protectedvoid onPause() {
super.onPause();
stopListening();
}
@Override
protectedvoid onResume() {
super.onResume();
startSignalLevelListener();
dataUsageInfo();
}
@Override
protectedvoid onDestroy() {
stopListening();
super.onDestroy();
}
private void stopListening() {
TelephonyManager tm = (TelephonyManager) getSystemService(TELEPHONY_SERVICE);
tm.listen(phoneStateListener, PhoneStateListener.LISTEN_NONE);
}
How To Run Android Application ?
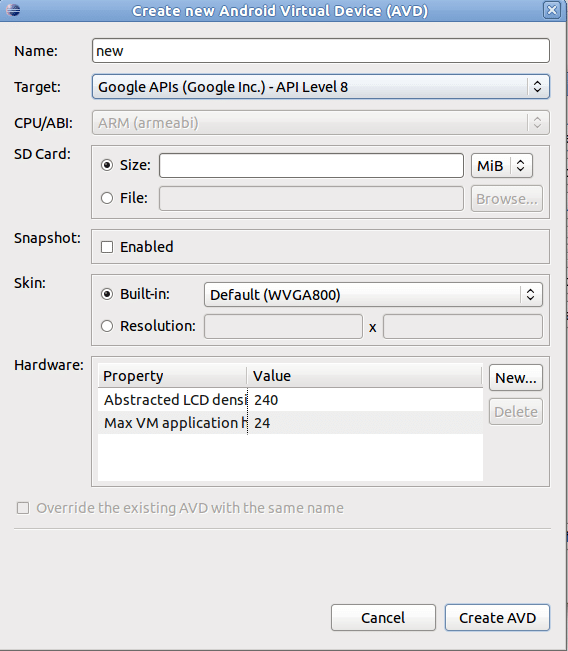
That’s all the work related with the coding part. Now you can run your application in Android Virtual device(AVD) or android phone. To use an android vitual device you have to create it in AVD manager. To create an AVD :
- Choose window->AVD Manager.
- Click New and enter the following details in the new pop up dialog box as shown in picture and click Create AVD when you are done.
Press Ctrl+F11 or click the Run icon in Eclipse to run your application. To run the application in android device:
- Enable USB debugging mode in the device settings and connect android device with computer using USB cable.
- Press Ctrl+F11 or click the Run icon in Eclipse to run your application.
![]()
It is always better to test and run your application in orginal android device than virtual device.


