Ansible Semaphore is a web-based user interface (UI) and dashboard for Ansible, a popular open-source automation tool. It provides a visual interface for managing and monitoring Ansible projects, playbooks, and job runs. Setting up Ansible Semaphore allows you to streamline and simplify your automation workflows, making it easier to collaborate with team members and monitor the execution of Ansible tasks.
Steps for Setting Up Ansible Semaphore
You have to do four things to set up ansible semaphore.
- Define an inventory: This is a set of IP addresses or DNS names from which Ansible knows where and how to connect machines.
- Secure authentication: This is for machines and includes setting up a user with SSH keys or defining a pseudo password.
- Create Playbooks: You need to create Playbooks in Ansible Semaphore. The Playbooks always need to be stored in the Git repository, so you would either need a get top or Gitlab account. Whenever Ansible Semaphore wants to start a new task, it puts down the latest version of Playbooks using Git, which is great for the consistency and integrity of your job.
Set up an environment.
For secure authentication, add a new SSH in ansible semaphore.
Step 1. Go to Ansible Semaphore, click on Key Store on the left panel, and click on NEW KEY to add a new key to the key store.

Step 2. Give a name to the key, and select the key type as SSH Key. Under Username, paste your private SSH key to authenticate your servers.
Step 3. Define the user that the private key should be used.
Add a pseudo password, for example, if some of your playbooks need that to become the root user. You can also create a new key for storing these credentials.
Step1. Click on Key Store on the left panel and click on NEW KEY.
Step 2. Switch the type to Login with password.
Step 3. Add your pseudo password.
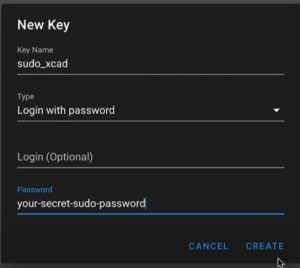
Step 4. Create a new key with type none. This key can use as a placeholder for public repositories.
To define inventory, click on Inventory on the left panel and then click on NEW INVENTORY.
Here you can select three types of inventories:
- Static: Static inventory file is managed and stored in Ansible Semaphore.
- Static YAML: YAML file is managed and stored in Ansible Semaphore
- File: Any type of file can be linked.
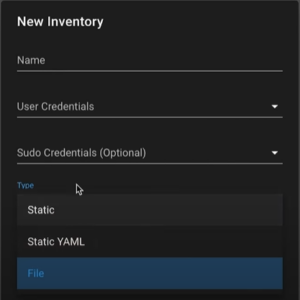
Define the inventory details, such as the hosts and variables to be used in the playbooks.
To add a new repository for storing playbooks:
Step 1. Click on Repositories on the left panel. Then click on the button NEW REPOSITORY.
Step 2. Give a name for the repository.
Step 3. Provide the URL of the repository.
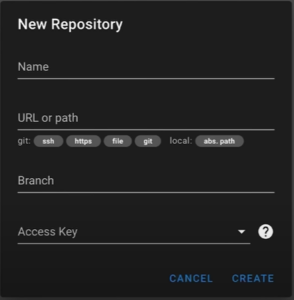
Step 4. Define the branch for your repository that should pull the playbooks.
Step 3. Choose the access key as none.
Note: You can add many repositories and branches accordingly.
To add environment:
Step 1. Click on Environment on the left panel, and then click on the NEW ENVIRONMENT button.
Step 2. Give a name to the environment.
Step 3. Add all environments by filling the Extra variable with two empty curly brackets.
Set Up Task Templates
Defining templates for running the actual playbooks can be done in three ways. And ansible them before by setting them up as normal, build, or deploy tasks.
Step 1. Click on Task Templates and then click on NEW TEMPLATE.
Step 2. Click on BUILD if you want to build software.
Step 3. Click on DEPLOY to deploy this software. Select the Build Template and ship your application to your target machine here.
Step 4. Click on Task.
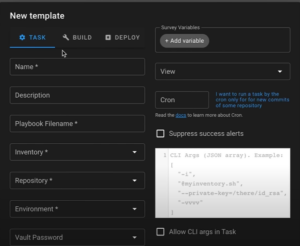
Step 5. Name the task and fill in all options and settings.
Note: You have to create Playbook in Git Repository.
Step 6. Add variables, customize arguments, or if you want to schedule it to run it every week or day. You can add a cron expression sothen answer with Semaphore automatically runs this playbook whenever you want.
Step 7. Click on Create.
Step 8. Click on the RUN button against the new template created.

Step 9. Select Dry Run for a quick test. This opens a new window, that shows what happens currently on the server. A new process starts in the Ansible Semaphore.
When the job is done, you can see the full history of all tasks executed.
To schedule a job:
Step 1. Click on Job and click on Add Job button. Select the job template you created from the drop-down list.
Step 2. Under Schedule Type, choose Periodic or Crontab.
If you choose Periodic, specify the interval at which the job should run.
If you choose Crontab, you can provide a custom Crontab expression to define the schedule precisely.
Step 3. Click on Save and Run to save the job and activate the schedule.
The scheduled job will now run at the specified intervals, executing the defined Ansible playbook against the designated hosts.
Step 4. Go to the Jobs to monitor the status and execution logs of your scheduled jobs.
Here, you can see the history of all job runs, whether they succeeded, failed, or are currently running.
Step 5. Click on the Edit or Delete options in Jobs to modify or remove a scheduled job.
Conclusion
You can now begin managing and monitoring your Ansible projects and playbooks through the web interface. Ansible Semaphore provides a user-friendly environment to define inventories, manage credentials, schedule jobs, and view execution logs. This makes it easier to collaborate and streamline your automation tasks.
Expert team of Xieles support guide you in all steps of Ansible Semaphore.


