The concept of Application pool was implemented in IIS to attain maximum stability and security through process isolation property within the domains hosted in the same server. Each application pools acts as an individual process and the code of every single domain will run in these pools in an isolated manner. Multiple domains could be also run in a single application pool. Each websites within an application pool shares the same worker process.The worker process that manages the application pool will not have any impact on the other application pools in the server. If the server is hosted by a single account the default application pool in IIS could be used. The processes will remain isolated and none of the domain features will be affected with the domains in the other processes. In general we could say that a logical separation is created between the processes to attain maximum security and efficiency.
IIS application pool can work in the following two modes:
Shared pool – One pool is used for all users and websites by default.
Dedicated pool – Separate pool for every customer is provided. It is also possible to allocate per-package pools within the customer’s pool, that will isolate running websites hosted under a particular package from other customer’s websites.
There are several factors to be taken care when a domain is assigned to an application. Some of the key points are noted below:
- Vulnerable websites which may affect other websites in the server should be assigned to a separate application pool.
- Commercially important websites and those works in a real time environment should be assigned to a dedicated pool.
- Websites of competing companies might be hosted in the same server and all these individual websites should be assigned in separate application pools in order to keep the confidentiality of the contents in the website.
- Resources such as memory, CPU and disk space required can be limited separately for each application pool ie, the resources available within the server could be efficiently managed and this is the one of the most important advantage of application pool. When the available resources are exhausted, the application poll will get recycled automatically.
Request Processing Modes in Application Pools
IIS 7.0 introduces two request processing modes for application pools:
- Integrated mode
- Classic mode
When you configure an application pool to run in integrated mode, IIS 7.0 processes requests for managed content by using the new integrated IIS and ASP.NET request processing pipeline. When you configure an application pool to run in classic mode, IIS processes requests for managed content by using the separate IIS and ASP.NET request-processing pipeline architecture that was introduced in IIS 6.0.
All applications maintain backward compatibility and run correctly in classic mode. Classic mode maintains the existing ASP.NET run-time architecture.
Integrated Mode
By default, IIS application pools run in this mode.
IIS will use the integrated request processing pipeline to process all IIS requests
Classic Mode
IIS will process the requests same as if the application running in IIS 6.0
IIS will route ASP.NET requests to Aspnet_isapi.dll ISAPI extension
The integrated pipeline mode was initially introduced in IIS 7 and this allows the HttpModules to participate in all requests, including those for static content, PHP pages and images.
In Classic mode, the requests are passed through IIS pipeline first, and then if the file extension is mapped to ASP.NET ISAPI extension, then the request is given to aspnet_isapi.dll and passes through the ASP.NET request pipeline. If the file is static file, ASP or PHP, it is handled by
something else.
Benefits of Classic Mode
- Backward compatibility. ASP.NET applications run as an ISAPI just as they do in IIS 6.0.
- Support for applications that cannot run in integrated mode .
- Ease of migration. There is no dependency on any application code changes.
Benefits of Integrated Mode
- ASP.NET support for all content types, including classic ASP pages and static files.
- Availability of unified features, such as authentication, that were previously duplicated in IIS and ASP.NET.
- ASP.NET modules that have access to all stages of the request processing pipeline.
How Application Isolation is implemented?
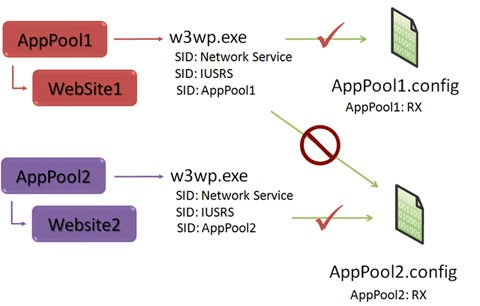
When a process/pool is started, IIS reads configuration details of that application pool from applicationHost.config. Then IIS creates and writes the configuration details to a temporary file that is named in the form apppoolname.config. Worker processes in the application pool will only have access to this temporary file, and not to other application pool configuration files. This feature helps to create an isolated pool, hence high performance and security can be achieved. The vulnerability of an application will not affect the processes running in other application pools. Please note down the below details while configuring isolation among application pools
- Categorize Applications that need to be included in a pool
- Create and name the application pools by using an intuitive naming convention.
- Assign process to the appropriate application pools.
The last point is very important there are many points to be taken care of while a process is assigned to an application pool
- Vulnerable processes should be assigned to a separate pool in order to avoid security breaches
- Availability and access rate should be considered
- If the process is related to real time or e commerce, separate pool should be assigned in order to attain high security
- Requires a configuration that is different from other applications that you have categorized as standard.
Advantages of Application isolation are:
- Each Application pool is considered as different identities, hence high security could be achieved
- An application pool can be recycled/restarted without affecting the sites that are running in different pools.
- Vulnerable websites can be placed in a separate pool and hence it wont affect the other processes in the same server
- The CPU/memory resources could be allocated to process in an effective manner.
- If you have multiple websites that each have their own SQL database, you can use active
- directory authentication instead of storing user names/passwords in web.config.
Application Pool identities
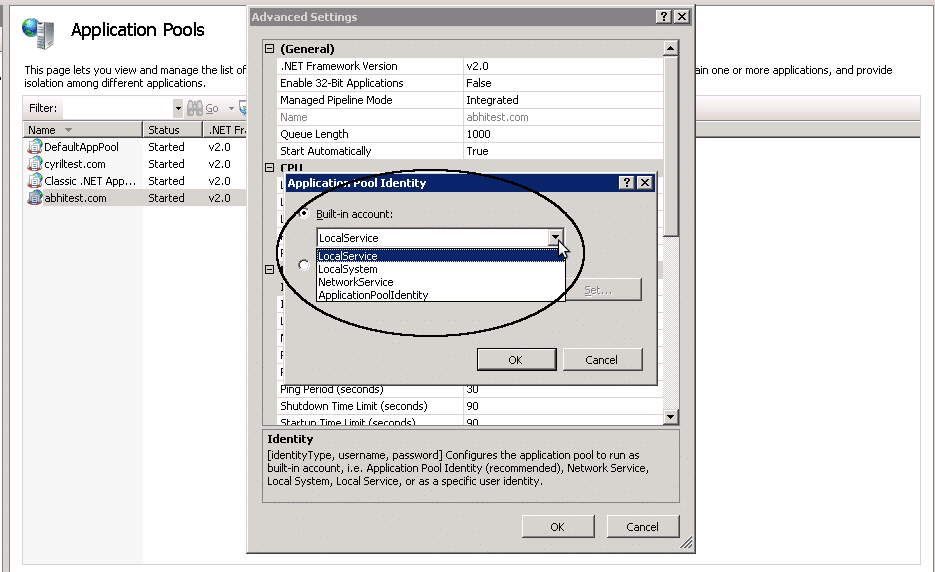
The Application included in the service pack 2 version of windows server 2008 known as Application pool identities. The Asp.net applications that execute inside asp.net worker process is called w3wp.exe. The applications are executed by the worker process of each application pool with a windows identity. The windows identity used is dependent on application pool identity. The application pool identity can be:
- Local service
- Local system
- Network service
- Application pool identity
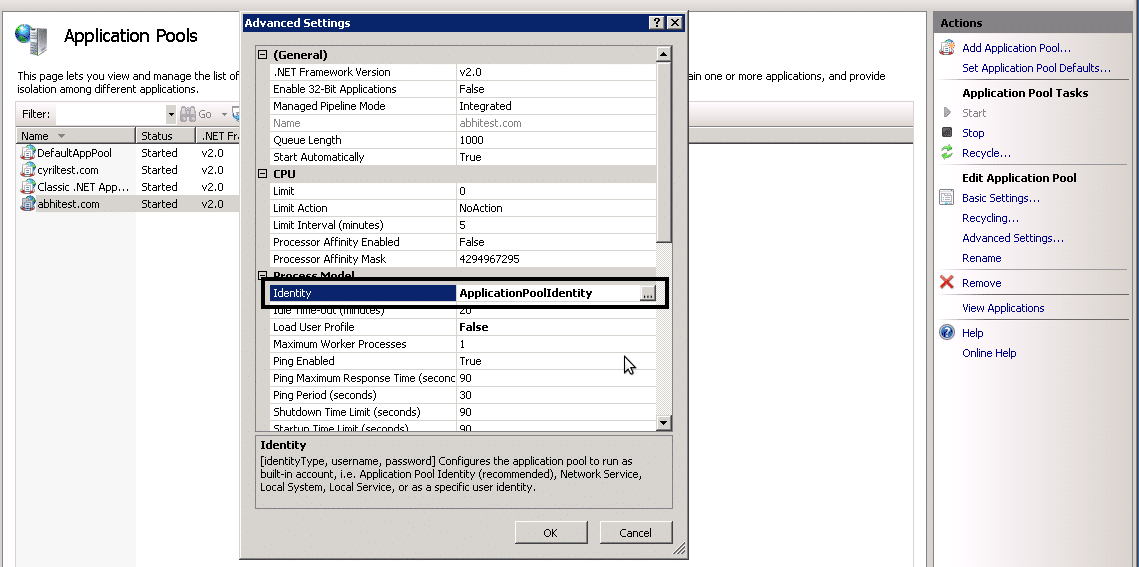
These are built in accounts and we can also use a custom account by specifying the user name and password. By default a new application pool uses Application pool identity.
Local System : This identity local service is given to a complete trusted account and high privileges are provided to access the network resources.
Network Service : Compared to local system, this identity has limited privileges. But it can access the network components as that was in Local system.
Local service : This service is very much similar to that of Network service but with only lest number of standard privileges. It cannot access the network components.
Application Pool identity : When a new application pool is created, IIS creates a virtual account with the name of the new application pool and run the application pools worker processes under this account. This is also a least privileged account.
The best practice would be running an application in the least privileged account because, it will reduce the chance of the server getting hacked due the vulnerabilities in the code of the domains containing them.
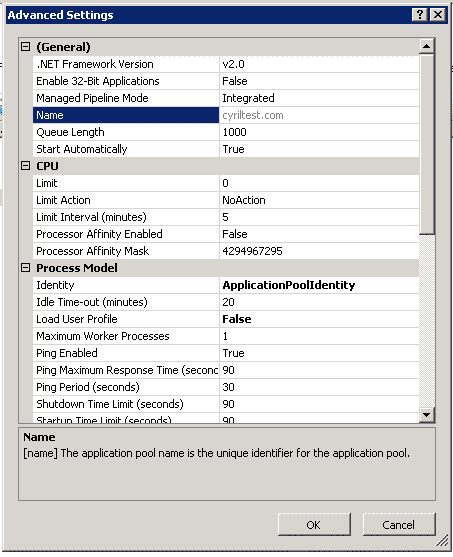
To change the identity of an App pool:
- Open IIS Manager
- Click Application Pools.
- Click Advanced Settings.
- Under General, change the identity of the pool as shown in the screen shots given above.
- Click OK.
Appcmd.exe : Command Line Utility
The appcmd.exe is a command line utilty introduced in IIS 7 which is used to perform various command line operations in your IIS web server. It help us to configure and query objects on our Web server, and to return output in text or XML format.
The uses of appcmd.exe are noted below:
- To create and configure sites, applications, application pools, and virtual directories.
- To start and stop sites in the webserver.
- To start, stop, and recycle application pools in the webserver
- To view the information about worker processes and requests that are running on the Web server.
In IIS 7 the Appcmd.exe utility is located in the folder:
%windir%\system32\inetsrv
To view a list of application pools by using appcmd.exe
Command:
appcmd list apppools
The output will as given below:
To create an application pool by using appcmd.exe
To add an application pool to a Web server. In this method the default settings will be used. The default settings could be changed later.
Syntax:
appcmd add apppool /name:SamplePool
Example:
I have created an application pool with the name testpool.
The output would be as follows:
To add an application pool to a Web server that runs in classic mode
Syntax:
appcmd add apppool /name:SamplePool /managedPipelineMode:Classic
Example:
I have created an application pool with the name ‘arunpool’ in classic mode
I have created an application pool with the name ‘arunpool’ in classic mode
To change the request-processing mode of an application pool by using appcmd.exe
Syntax:
appcmd set apppool /apppool.name:SamplePool /managedPipelineMode:Integrated
Example:
I need to change my testpool to integrated mode.
To create a site by using appcmd.exe
At the command prompt, type
Syntax:
appcmd add site /name:SampleSite /physicalPath:C:\inetpub\SampleSite
Example:
I need to create a site using the appcmd.exe utility
To assign a site to an application pool by using appcmd.exe
Syntax:
appcmd set app “SampleSite/” /applicationPool:SamplePool
Example:
I need to assign my site “SampleSite” to an application pool. In the below example, I need to assign my site to an application pool “arunpool”
Overlapped Recycling of Application Pools
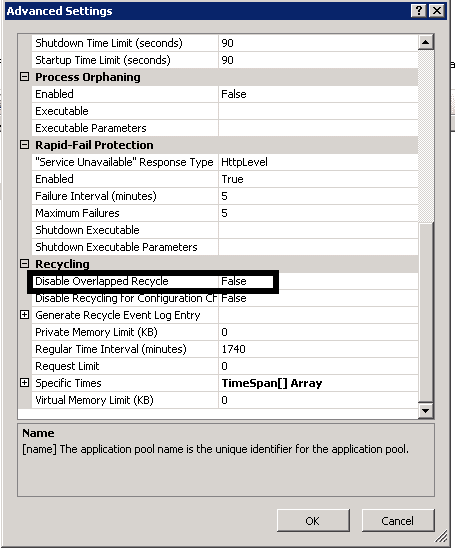
Due to high Server load if a process has reached the specified threshold limit, prior to the restart a new similar pool will be created and all the new request will be automatically assigned to the new pool. Before the stopping of the previous process a certain time interval will be given to complete all the pending tasks in the pool. This process is called as overlapped recycling of application pools. This feature can be turned on or off in the advanced settings option as given below
Application Pool Configuration Settings
Application Pools provide you with additional level of website management. They are supported only by Windows Server 2003/2008/Vista/7. You can configure them in the Internet Information Services (IIS) Manager under local computer -> Application Pools.
You can check and change the assigned application pool by right-clicking an application under local computer -> Sites -> Default Web Site (or other web site) and selecting Manage Application -> Advanced Settings
Tuning of Application Pools
The main settings that we deploy to tune our application pool is changing the virtual memory of the
individual pools. This is done with an aim to attain maximum uptime for the server. We should
determine the virtual memory limit for each application pool based on several factors like,
- The proper balance between not recycling too frequently and maintaining good performance.
- Which application pools contain applications that leak memory more rapidly than others do.
- Which applications frequently require increased memory.
We also use several other application pool settings and configurations to achieve the highest possible availability of our site. For example, we:
- Ensure that we log as much activity as possible to help in troubleshooting scenarios.
- Use integrated instead of classic mode whenever possible.
- Set the IIS 7.0 rapidFailProtection property to False.
It’s important to set application pool queue-length limits correctly on an IIS server. Application pools provide an isolated worker process in which one or more URLs are executed. Incoming requests are placed in an application pool queue. If this queue grows too large, the server
can run out of memory.
The default size of an application pool queue is 4000, which might be tool small for a multi- processor machine and sufficient RAM. IIS admins should use trial-and-error, aided by load testing, to adjust the application pool queue-length limit to service the maximum number of requests withouts negatively impacting performance.
Please note down certain other performance tuning methods that could be deployed for better performance
HTTP Compression: This feature is used to reduce the file sizes inorder to imrove theefficency of data transfer between server and the client machine.
In order to enable HTTP Compression, please use the below syntax:
appcmd set config /section:httpProtocol /allowKeepAlive:true
Limiting Connections: Describes how to set limits on the number of connections allowed to a Web server.
Setting Connection Timeouts: This feature is set inorder to kill a worker process after a specific time due to inactivity in the server. This will help in reducing the server load, and efficient memory allocation when no new processing space in available.
To configure idle time out value for an application pool:
appcmd set config /section:applicationPools /[name=’ string ‘].processModel.idleTimeout:timeSpan
Throttling Bandwidth: In IIS we have provision to change the bandwidth used by a Web server and individual Websites.
Scalability: Provides information and links to detailed resources about scalability.
Enabling CPU Monitoring in IIS: Describes how to monitor and stop problematic applications.
Configuring Application Pool Queue-Length Limits: By default the maximum number of requests that IIS handled is set to 1000. But we have the provision to change this value in order to improve the server performance.
To change the Queue-Length Limits please follow steps given below.
- Open IIS Manager
- Click Application Pools.
- Click Advanced Settings.
- Under General, click Queue Length, and then change the queue length.
- Click OK.
HTTP Keep-Alives: Describes how to use HTTP Keep-Alive requests to maintain an open connection. By default, this feature is enabled in IIS 7. This improves the overall efficency on the server because the server can return the content for each request more faster. Otherwise, the server
will haveto open a new connection for every request. To enable the HTTP keep-alive header.
Syntax:
appcmd set config /section:httpProtocol /allowKeepAlive:true
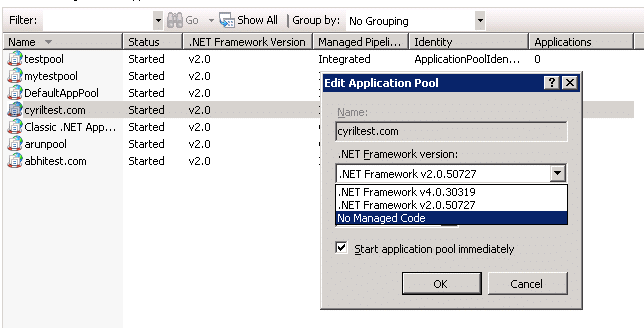
Procedure to assign a .NET Framework Version for an Application Pool
In an IIS web server there will be many applications hosted which may be using different versions of .NET Frameworks. The grouping of applications in the pools must be based on the .NET frameworks that these applications are using. The Applications hosted in the same application pool must be using the .NET Framework version; otherwise, their associated worker processes will not run.
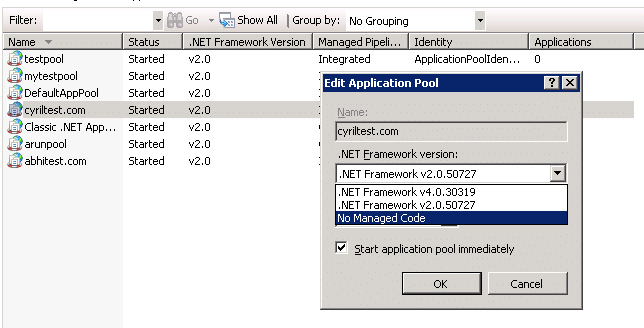
Steps to assign the .NET Framework Version are given below:
- Open IIS Manager
- Click Application Pools.
- Select the pool for which you want to specify a .NET Framework, and then click Basic Settings
- In in the .NET Framework version list, select the version that you want the application pool to use.
- Select No Managed Code if the application uses only native code.
- Click OK.
Using the command line utility :
appcmd set config /section:applicationPools /[name=’
string’].processModel.identityType:SpecificUser|NetworkService|LocalService|LocalSystem
The variable string is the name of the application pool that you want to configure.
References:
http://technet.microsoft.com/en-us/library/cc745955.aspx
http://thatextramile.be/blog/2010/06/why-do-we-recycle-our-application-pools


