
NDK stands for Native Development Kit. Android NDK is all about injecting high performance into android apps. It exploits the maximum power of mobile devices using high-performance and portable code. Android apps are typically written in Java, with its elegant object-oriented design. However, at times, we need to overcome the limitations of Java, such as memory management and performance, by programming directly into Android native interface.
Android provides Native Development Kit (NDK) to support native development in C/C++, besides the Android Software Development Kit (Android SDK) which supports Java. Native code (in C/C++) is necessary for high performance to overcome the limitations in Java's memory management and performance.
About JNI
JNI stands for Java Native Interface. JNI acts as the interface between java code and c/c ++ code.
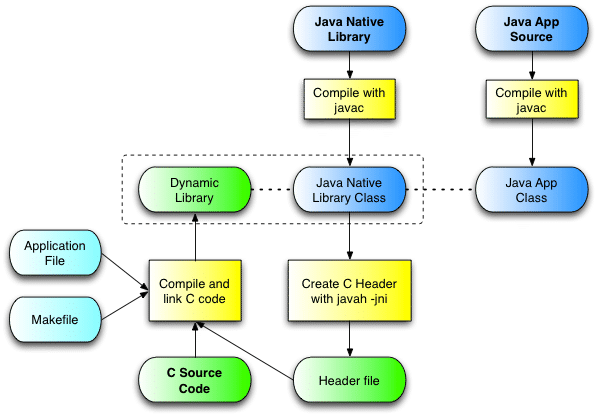
The picture above shows the the program flow of java code alone and java code with c source code.
Prereqisites for NDK
- Java
- Eclipse
- Android SDK
- Cygwin(If using windows OS)
The steps for installing and setting up the above prerequisites are explained in the article Android – Developing Applications .
Setting up NDK
Follow these steps to install ndk in your system. But before that, make sure you have already installed the prerequisites for NDK.
- Download NDK for your system from here
- Extract and copy the folder in the location where you have put SDK.
Installing C/C++ Development Tools in Eclipse
- Go to Help ->Install New Software in Eclipse.
- Type the URL to latest eclipse and click Add button.
- Select all and follow the instructions.
Application Development Using NDK
These are the steps for developing android application using NDK.
- Create a new android project.
- Create a folder 'jni' inside the project folder.
- Create a java class for calling the native code and place it in src folder.
- Create the native code header file and place it in jni folder.
- Implement the native code in C and place it in jni folder
- Create the makefile 'Android.mk' in jni folder.
- Use the native code inside android activity.
- Build the project using ndk-build.
- Compile and run the project.
Creating an Application using NDK
Let's create an android application using NDK to test the performance of NDK over SDK. We are going to test the performance of NDK and SDK on the basis of how much time will it take for producing the output for same recursion function. We know that recursion in java might end up in 'stackOverflowError' in most of the cases. Let's see the performance of NDK and SDK.
Launch 'New Android Application' wizard. Let's give the android application a name – 'ndk'. Now create a folder in the name 'jni' inside the project. We will be placing the makefile, c header file and c source code in jni folder.
The first two steps for developing android application using NDK are completed. Now let's move on to the third step. ie, creating a java class for calling the native code in C language. So, create a java class 'connect' in src folder. The connect class is the interface between java and native code. In connect class, we are going to write the code for java recurssion and loding native library. The code for java recursion is below :
publicstaticlong javaRecursive(long n)
The code for loading native library and c recurssive function :
static
publicstaticnativeint nativeRecursive(int n);
That's all needed in connect class. Now moving to fourth step. For creating the header file, we have to execute some commands in command line. Before executing those commands, make sure 'javah' is installed in your system.
- Move on to the project directory.
- Get in to the 'bin/classes' directory.
- Now execute the below command.
$ javah -o ../../jni/connect.h com.example.ndk.connect
Succesful execution of this command will create the header file 'connect.h' in 'jni' folder. The newly created connect.h will look like this.
/* DO NOT EDIT THIS FILE – it is machine generated */
#include
/* Header for class com_example_ndk_connect */
#ifndef _Included_com_example_ndk_connect
#define _Included_com_example_ndk_connect
#ifdef __cplusplus
extern"C"
#endif
#endif
Now it's time to write native code in C. Create a file native.c and place it in 'jni' folder. Write the native recursion code in native.c
#include"connect.h"
jint sum=0;
jint nativeRecursive(jint n)
JNIEXPORT jint JNICALL Java_com_example_ndk_connect_nativeRecursive
(JNIEnv *env, jclass obj, jint n)
After that we are moving to the sixth step for creating the makefile 'Android.mk'. Create a file Android.mk with the following code and place it in jni folder .
LOCAL_PATH := $(call my-dir)
include$(CLEAR_VARS)
LOCAL_MODULE := native
LOCAL_SRC_FILES := native.c
include$(BUILD_SHARED_LIBRARY)
Now we are going to use the native code in our main activity. For that, first we have to create the xml layout. Write the below xml code in activity_example.xml file which is in res/layout folder.
xml version="1.0" encoding="utf-8"?>
<LinearLayout xmlns:android="http://schemas.android.com/apk/res/android"
android:orientation="vertical" android:layout_width="fill_parent"
android:layout_height="fill_parent" android:gravity="center_horizontal">
<TextView android:layout_width="fill_parent"
android:layout_height="wrap_content" android:text="@string/app_name"
android:gravity="center" android:textSize="40sp"
android:layout_margin="10dp" />
<LinearLayout android:layout_width="wrap_content"
android:layout_height="wrap_content">
<EditText android:layout_width="wrap_content"
android:layout_height="wrap_content" android:id="@+id/editInput"
android:hint="Input" android:textSize="30sp" android:inputType="number"
android:layout_margin="10dp">EditText>
<Button android:layout_width="wrap_content"
android:layout_height="wrap_content" android:id="@+id/buttonGo"
android:text="Go" android:textSize="30sp" android:layout_margin="10sp">Button>
LinearLayout>
<TextView android:layout_width="wrap_content"
android:layout_height="wrap_content" android:id="@+id/textResult"
android:text="" android:textSize="20sp">TextView>
LinearLayout>
After that make native calls in main activity. ie, example.java.
start = System.currentTimeMillis();
result = connect.javaRecursive(input);
stop = System.currentTimeMillis();
out += String.format("Time taken for Java recursion: %d (%d msec)", result, stop – start);
start = System.currentTimeMillis();
res = connect.nativeRecursive(input);
stop = System.currentTimeMillis();
out += String.format("\n\nTime taken for native recursion: %d (%d msec)", res, stop – start);
Configuring Build Path
We have finished the coding part. Now we have to build the project using ndk-build. For that we should configure the build path to use ndk-build. The steps for configuring build path is below.
- Right click on project folder in Eclipse and take Configure Build Path from Build Path.
- Click on Builders in left side panel and click New.
- Click Ok. Enter the builder name in new window.
- Specify the Location of ndk-build. Click on Browse File System and select ndk-build from the ndk extracted folder.
- Specify the Working Directory. Click on Browse Workspace and select ndk.
- Move to Refresh tab and click on Specify Resources and select libs folder in ndk.
- Move to Build Options tab and click on Specify Resources and select jni folder in ndk.
That's all for configuring build path.
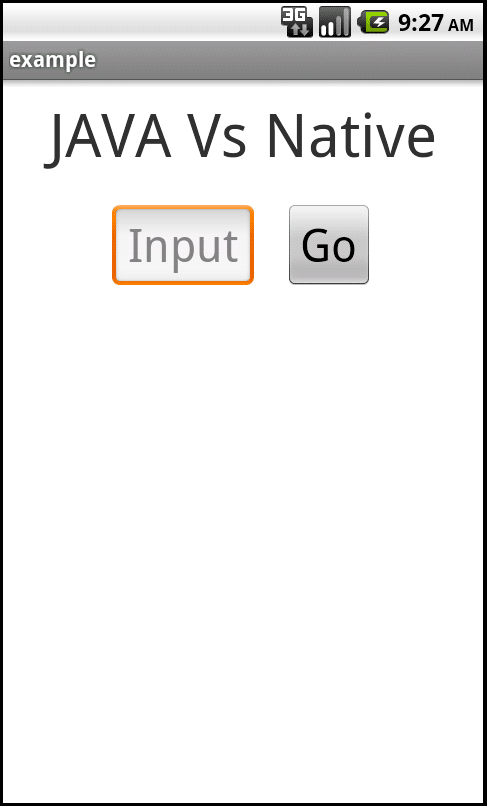
Now run the project. We will get a screen like this.
Give an input 22 amd see the result.
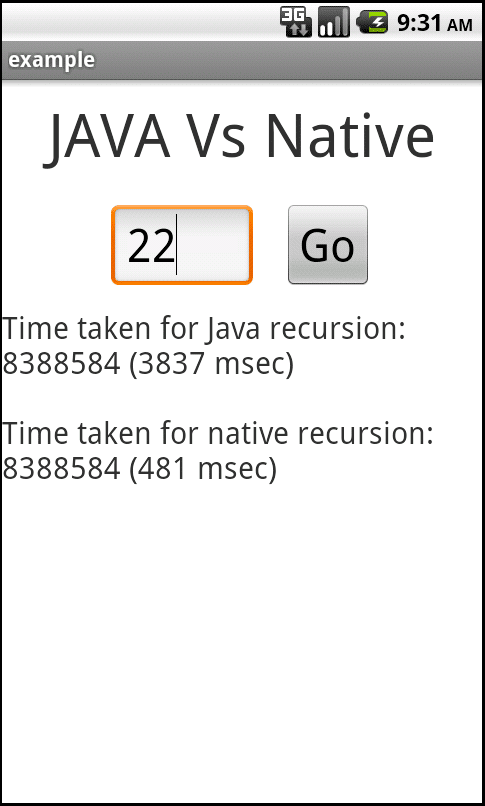
The same recursive function is executed with much time in java code than native code. So the performance of NDK is much better than SDK.
