Drupal is an open-source content management system written in PHP. It is used to manage content on informational sites, social media sites, member sites, intranets and web applications. Drupal follows a modular, building block approach that allows for unlimited customization. Drupal, on the other hand, is a second generation CMS. It means that a lot of new or customized functionality can be created in the user interface without programming. Drupal handles countless content types including video, text, blog, podcasts, and polls etc.
Advantages
- Flexibility – Drupal is the most flexible CMS on the market right now. It can be tailored to fit unique business needs and does not constrain companies to a one-size-fits-all approach.
- Offer shorter time to market for new or improved features on your site.
- Scalability – Drupal has many off-the-shelf modules available. While some may require customization, they can be added on to the core Drupal CMS with relative ease. These ensures your site can grow and change as your organization does the same.
- Security – Drupal has been built with security in mind and has had considerably less security issues than similar solutions and systems.
- Drupal offer sustainable maintenance when many small changes happen that affect functionality as well as design
- Lower the total cost of ownership – As a result of Drupal being free software, offering shorter development time, less dependence on service providers and lower maintenance costs.
Modules
Drupal modules are plug-ins that extend Drupal’s functionality. There are three main types of modules:
- Core modules
- Contributed modules
- Custom modules
Core modules are included in the default Drupal install and are located in the main “modules” directory in the root directory of the Drupal install. These are do-not-touch-the-code modules, but settings for core modules can be changed in the Drupal admin interface.
Contributed modules extend the features that are not currently in Drupal core or core modules. These are modules that have been created by users in the Drupal community, who have made their code available for use via the Projects section on Drupal.org. These modules are placed within the “sites” directory instead of the main modules directory. Using contributed modules not only saves initial coding time, it also makes it significantly easier for you and, especially, others to maintain the site in the future. Contributed modules also benefit from multiple eyes and multiple users to find problems and improve code.
Custom modules are created by the developer itself for a particular use, specific to the site they are working on. Custom modules allow you to provide your own blocks or nodes to work exactly as you need for your site, or to add snippets of code that you want to use in multiple places across your site. In this article, we are going to see how to create a custom module.
Creating Modules
In this tutorial we are going to create a simple contact form module. First choose a name for your module. For this example we’ll choose the name “simple_contact_form”. According to the example, the short name of the module should only contain lowercase letters and underscores.
Typically, a Drupal module has at least the following parts:
- A module directory that contains all module files
- An information file
- A module PHP code file
Create a new directory for the module under the modules directory called simple_contact_form ie sites/all/modules/simple_contact_form/. It is good practice to put all custom modules in sites/all/modules/ folder and not the modules/ folder. The modules folder is meant for core modules. Any “third party” or custom modules should be in sites/all/modules/. Inside the directory /simple_contact_form, we will create two files. The first file, which we will see in the following section, will contain information about our module. The second one will contain the module’s PHP source code.
Creating .info file :-
The first file in our module is the .info file. Drupal uses the .info file to determine details about the module, including whether the module can be installed and what other modules it depends upon. A .info file is always named with the name of the module, so our module must be named simple_contact_form.info. For this module, we will simply specify the required properties name, description and core. Although it is optional to add the files property, it won’t hurt to do so. By Drupal’s coding conventions, there should always be one space on each side of the equals sign. See the example.
name = Simple Contact Form
description = Module to create a simple contact form.
core = 7.x
This lets Drupal know about your module. The name directive is used to declare what the module’s human-readable name is. The description provides a one or two-sentence description of what this module provides or is used for. Among other places, this information is displayed on the module configuration section of the administration interface.
The next directive is the core directive: core = 7.x. This simply declares which main-line version of Drupal is required by the module. All Drupal 7 modules will have the line core = 7.x.
Some of the additional fields that could be added into .info file are :-
php = 5.6
dependencies[] = path
version = 1.0
php specifies the version of php that should be supported for our module. If our module will not run without enabling any other modules, then that module name can be specified in dependencies. Version simply specifies the current version of our module.
Hook system :-
Before going to the .module section, we should make an idea about Drupal’s hook system. Drupal hooks helps the module to interact with the Drupal core system. Hooks are nothing but functions defined by the user. Tey are used to extend and simplify the functionality of Drupal module. Usually they are named like modulename_hookname(). For example simple_contact_form_menu() in our module.
<?php
function simple_contact_form_menu()
{
//Code for generating menu.
}
?>
Other commonly used Drupal hooks are hook_init(), hook_user(), hook_help, hook_block() etc. You can see all the available hooks in Drupal’s developer documentation.
Creating .module file :-
For our system the file is named as simple_contact_form.module. We will start with the declaration of menu here. The function looks like the following :-
function simple_contact_form_add_form($form_state)
{
global $user;
if ( $user->uid ) {
$form = array();
$form[‘name’] = array(
‘#title’ => ‘Name’,
‘#type’ => ‘textfield’,
‘#maxlength’ => ’50’,
‘#required’ => ‘true’
);
$form[’email’] = array(
‘#title’ => ‘Email’,
‘#type’ => ‘textfield’,
‘#maxlength’ => ’50’,
‘#required’ => ‘true’
);
$form[‘phonenumber’] = array(
‘#title’ => ‘Phone Number’,
‘#type’ => ‘textfield’,
‘#maxlength’ => ’50’,
);
$form[‘subject’] = array(
‘#title’ => ‘Subject’,
‘#type’ => ‘textfield’,
‘#maxlength’ => ’50’,
‘#required’ => ‘true’
);
$form[‘message’] = array(
‘#title’ => ‘Message’,
‘#type’ => ‘textarea’,
‘#maxlength’ => ’20’,
‘#required’ => ‘true’
);
$form[‘submit’] = array(
‘#type’ => ‘submit’,
‘#value’ => ‘Submit’,
);
return $form;
}
else {
drupal_set_message(‘Please login first..’);
}
}
You can see a condition for user id. This is to check whether the user is logged in, otherwise a warning message will be displayed. This will give access to the module only for logged in users.
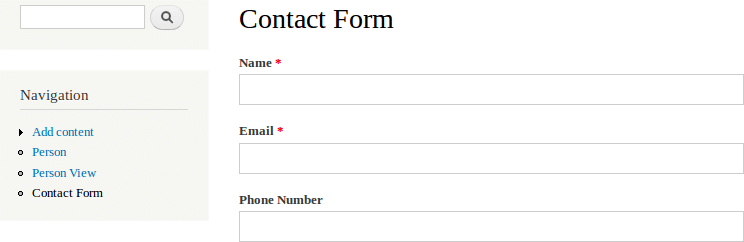
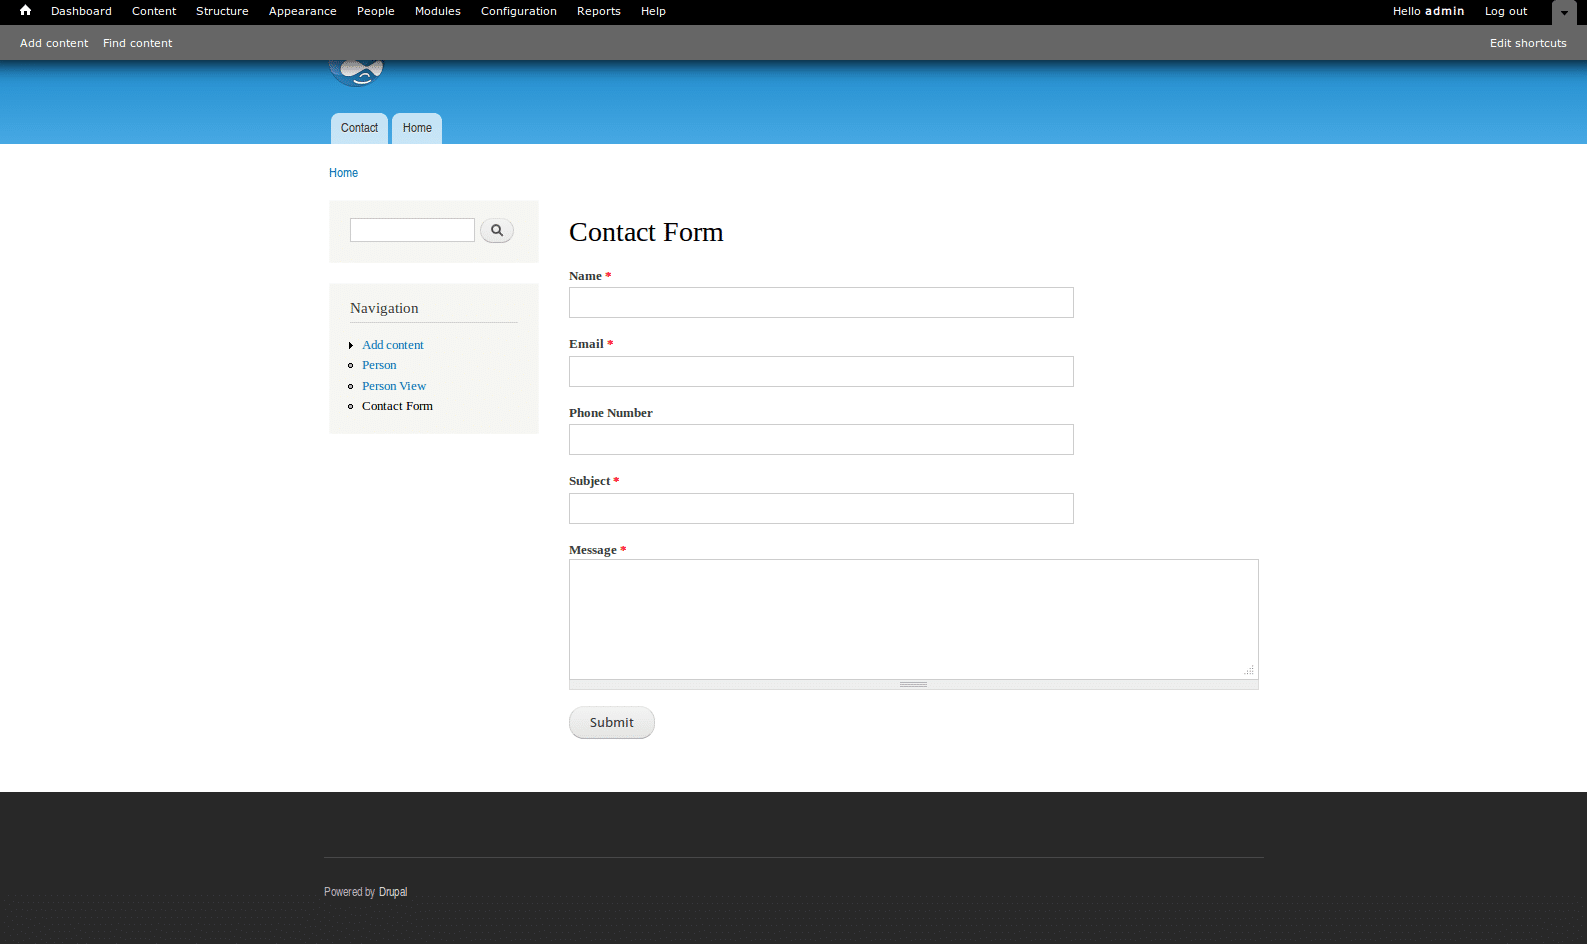
The created form will appear on clicking the menu Contact Form.
The submitted form data is stored in $form_state[‘values’]. So to get the values, you should write like
$name = $form_state[‘values’][‘name’];
$email = $form_state[‘values’][’email’];
To add validation for email, we can write something like this.
function simple_contact_form_add_form_validate($form,$form_state)
{
$valid_email = $form_state[‘values’][’email’];
if (!valid_email_address($valid_email)) {
form_set_error(’email’, ‘Sorry. Your email address “‘ . $valid_email . ‘” is not valid. Please submit a valid E-mail address.’);
}
}
The next step is to store the submitted form data into database. So first of all we should create a table to store the details. But it would better if the table is created while installing the module. This is explained in detail in the section Creating .install file. In the submit function, all the field values are retrieved from $form_state and inserted into the table.
function simple_contact_form_add_form_submit($form,$form_state)
{
$name = trim($form_state[‘values’][‘name’]);
$email = trim($form_state[‘values’][’email’]);
$phonenumber = trim($form_state[‘values’][‘phonenumber’]);
$subject = trim($form_state[‘values’][‘subject’]);
$message = trim($form_state[‘values’][‘message’]);
$query = “INSERT INTO contact_form (`name`, email,phonenumber,subject,message) VALUES (‘$name’, ‘$email’, ‘$phonenumber’, ‘$subject’, ‘$message’)”;
$result = db_query($query);
if ($result !== FALSE){
drupal_set_message(‘Contact details saved successfully.’);
}
}
Creating .install file :-
A .install files defines new tables, load data, and implement conversions during updates. It is run when a module in enabled. The most common task here is creating database tables and fields. The .install file does not have any special syntax. It is merely a PHP file with a different extension. The table structure is specified inside the function simple_contact_form_schema.
function simple_contact_form_schema()
{
$schema[‘contact_form’] = array(
‘description’ => t(‘Store .’),
‘fields’=>array(
‘id’=>array(
‘type’=>’serial’,
‘unsigned’=>TRUE,
‘not null’=>TRUE
),
‘name’=>array(
‘type’=>’varchar’,
‘length’=>255,
‘default’ => ”,
‘not null’=>TRUE
),
’email’=>array(
‘type’=>’varchar’,
‘length’=>255,
‘default’ => ”,
‘not null’=>TRUE
),
‘phonenumber’=>array(
‘type’=>’varchar’,
‘length’=>255,
‘default’ => ”,
‘not null’=>TRUE
),
‘subject’=>array(
‘type’=>’varchar’,
‘length’=>255,
‘default’ => ”,
‘not null’=>TRUE
),
‘Message’=>array(
‘type’=>’text’,
‘not null’=>TRUE
),
),
‘primary key’=>array(“id”),
);
return $schema;
}
Install instructions are enclosed in a hook_install function. This hook will be called when the module is first enabled.
/**
* Implement hook_install()
*/
function simple_contact_form_install(){
drupal_install_schema(‘contact_form’);
}
If the module you are writing the .install file for is already installed then the install will not trigger even if you disable/enable it. You need to disable the module and remove its record manually form the system table or include a hook_uninstall function.
/**
* Implement hook_uninstall
*/
function simple_contact_form_uninstall(){
drupal_uninstall_schema(‘contact_form’);
db_drop_table(‘contact_form’);
// clear the cache tables
cache_clear_all(null, ‘cache’);
cache_clear_all(null, ‘cache_filter’);
cache_clear_all(null, ‘cache_menu’);
cache_clear_all(null, ‘cache_page’);
watchdog (‘SimpleContactForm’, ‘Contact Forms module removed’);
}
Install and enable module :-
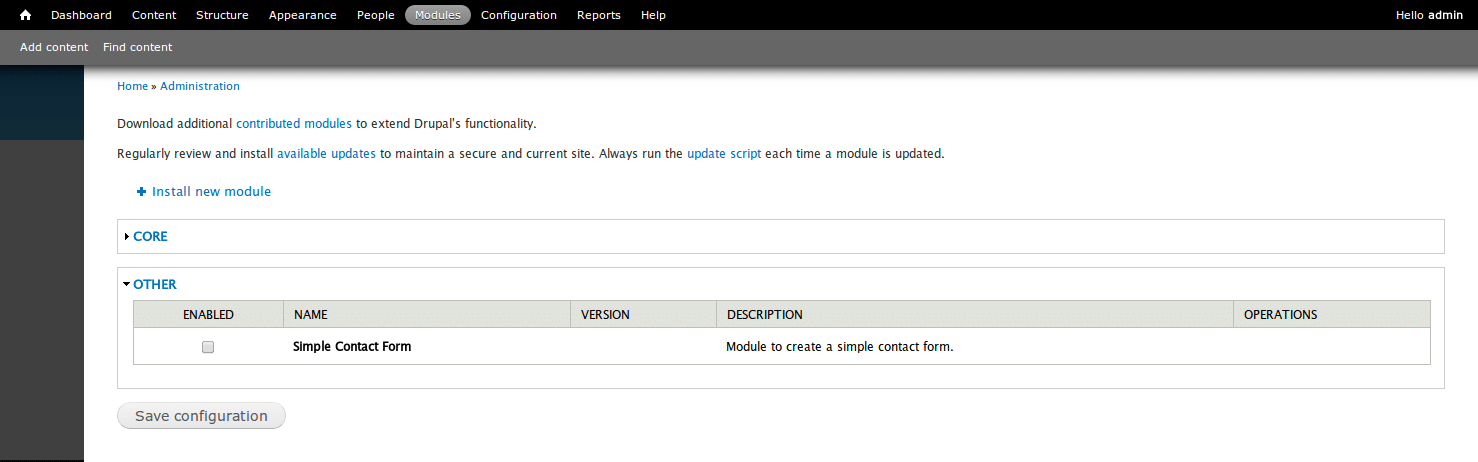
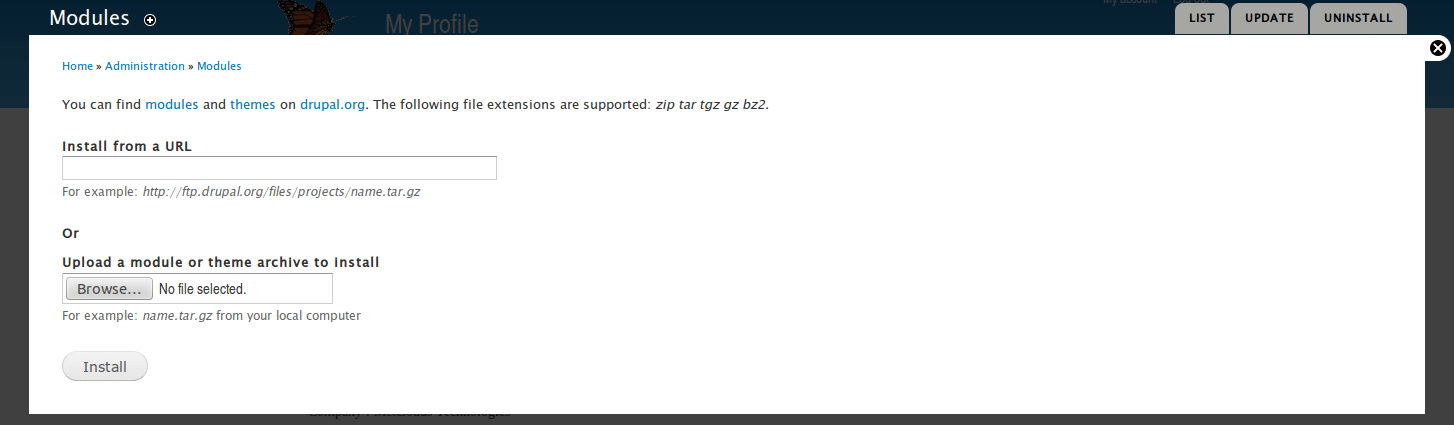
Installing a module is relatively easy and done through the Drupal dashboard. To install the module, go through the following steps.
- Login to Drupal dashboard
- Go to modules
- Click on the link Install new module
- Upload the file and click install
- To enable the module click on Enable newly added modules
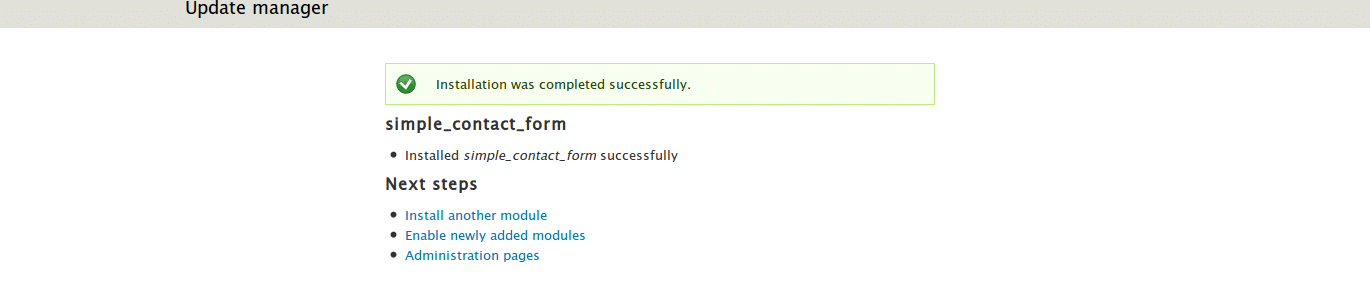
- Check the enable button of the module Simple Contact Form

- Save configuration
- You can find a link Contact Form on the Navigation menu
Conclusion
Drupal is an open-source content management system written in PHP, which is highly flexible and secure compared to other CMS. Drupal modules are like plug-ins that extend drupal’s functionality. Drupal has many popular add-on modules to suit your site’s needs. We can create Custom modules, specific to the use of our site. Custom modules allow you to provide your own blocks or nodes to work exactly as you need for your site.
The source code of sample module can be downloaded from here
