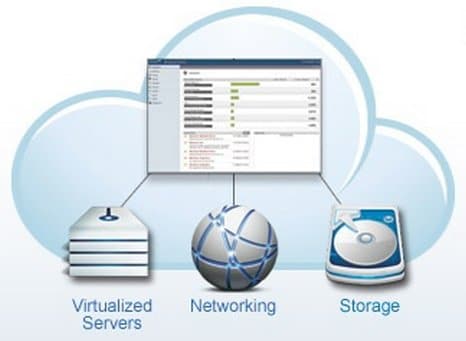
Apache CloudStack is open source software designed to deploy and manage large networks of virtual machines, as a highly available, highly scalable Infrastructure as a Service (IaaS) cloud computing platform. CloudStack is used by a number of service providers to offer public cloud services, and by many companies to provide an on-premises (private) cloud offering, or as part of a hybrid cloud solution.
CloudStack currently supports the most popular hypervisors: VMware, KVM, XenServer and Xen Cloud Platform (XCP).Users can manage their cloud with an easy to use Web interface, command line tools, and/or a full-featured RESTful API. In addition, CloudStack provides an API that’s compatible with AWS EC2 and S3 for organizations that wish to deploy hybrid clouds.
Advantages of Cloudstack:
a)Multiple Hypervisor Support
b)Massively Scalable Infrastructure Management
c)Automatic Configuration Management
d)Graphical User Interface
e)API and Extensibility
f)High Availability
Requirements:
Management Server Requirements:
a) Operating system:
Preferred: CentOS/RHEL 6.3+ or Ubuntu 12.04(.1)
b) 64-bit x86 CPU (more cores results in better performance)
c) 4 GB of memory
d) 250 GB of local disk (more results in better capability; 500 GB recommended)
e) At least 1 NIC
f) Statically allocated IP address
g) Fully qualified domain name as returned by the hostname command
Database Server Requirements:
a) Operating system:
Preferred: CentOS/RHEL 6.3+ or Ubuntu 12.04(.1)
b) 64-bit x86 CPU (more cores results in better performance)
c) 4 GB of memory
d) 250 GB of local disk (more results in better capability; 500 GB recommended)
e) At least 1 NIC
f) Statically allocated IP address
g) Fully qualified domain name as returned by the hostname command
Storage Server Requirements:
a) Operating system:
Preferred: CentOS/RHEL 6.3+ or Ubuntu 12.04(.1)
b) 64-bit x86 CPU (more cores results in better performance)
c) 4 GB of memory
d) 250 GB of local disk (more results in better capability; 500 GB recommended)
e) At least 1 NIC
f) Statically allocated IP address
g) Fully qualified domain name as returned by the hostname command
XenServer Host Requirements:
The host must be certified as compatible with one of the following. See the Citrix Hardware Compatibility Guide: http://hcl.xensource.com
a) XenServer 5.6 SP2, XenServer 6.0 ,XenServer 6.0.2
b) You must re-install Citrix XenServer if you are going to re-use a host from a previous install.
c) Must support HVM (Intel-VT or AMD-V enabled)
d) Be sure all the hotfixes provided by the hypervisor vendor are applied. Track the release of hypervisor patches through your hypervisor vendor’s support channel, and apply patches as soon as possible after they are released. CloudStack will not track or notify you of required hypervisor patches. It is essential that your hosts are completely up to date with the provided hypervisor patches. The hypervisor vendor is likely to refuse to support any system that is not up to date with patches.
e) All hosts within a cluster must be homogeneous. The CPUs must be of the same type, count, and feature flags.
f) Must support HVM (Intel-VT or AMD-V enabled in BIOS)
g) 64-bit x86 CPU (more cores results in better performance)
h) Hardware virtualization support required
i) 4 GB of memory
j) 36 GB of local disk
k) At least 1 NIC ;Statically allocated IP Address
Installation:
Configure Cloudstack Repo:
1) Log in to your OS as root.
Open /etc/yum.repos.d/cloudstack.repo in your favourite editor and add the following:
[cloudstack]
name=cloudstack
baseurl=http://cloudstack.apt-get.eu/rhel/4.2/
enabled=1
gpgcheck=0
2) Check for a fully qualified hostname.
hostname –fqdn
This should return a fully qualified hostname such as “management1.lab.example.org”. If it does not, edit /etc/hosts so that it does.
Make sure that the machine can reach the Internet.
ping www.cloudstack.org
3) Turn on NTP for time synchronization.
Install NTP.
yum install ntp
4) Install the Management Server:
yum install cloudstack-management
5) Add vhd-util
This procedure is required only for installations where XenServer is installed on the hypervisor hosts.
Before setting up the Management Server, download vhd-util from http://download.cloud.com.s3.amazonaws.com/tools/vhd-util. If the Management Server is RHEL or CentOS, copy vhd-util to /usr/share/cloudstack-common/scripts/vm/hypervisor/xenserver
Database Server Installation:
1) Install MySQL from the package repository from your distribution:
yum install mysql-server
2) Edit the MySQL configuration (/etc/my.cnf or /etc/mysql/my.cnf, depending on your OS) and insert the following lines in the [mysqld] section. You can put these lines below the datadir line. The max_connections parameter should be set to 350 multiplied by the number of Management Servers you are deploying.
innodb_rollback_on_timeout=1
innodb_lock_wait_timeout=600
max_connections=700
log-bin=mysql-bin
binlog-format = ‘ROW’
bind-address = 0.0.0.0
3) Start or restart MySQL to put the new configuration into effect.
On RHEL/CentOS, MySQL doesn’t automatically start after installation. Start it manually.
service mysqld start
4) CentOS and RHEL only; not required on Ubuntu
Run the following command to secure your installation. You can answer “Y” to all questions except “Disallow root login remotely?”. Remote root login is required to set up the databases.
mysql_secure_installation
5) If a firewall is present on the system, open TCP port 3306 so external MySQL connections can be established.
On RHEL/CentOS:
Edit the /etc/sysconfig/iptables file and add the following line at the beginning of the INPUT chain.
-A INPUT -p tcp –dport 3306 -j ACCEPT
Now reload the iptables rules.
service iptables restart
6) Return to the root shell on your first Management Server.
7) Set up the database. The following command creates the cloud user on the database.
cloudstack-setup-databases cloud:@ \
–deploy-as=root: \
When this script is finished, you should see a message like “Successfully initialized the database.”
Storage Server Installation:
Cloudstack installation requires primary and storage devices
This section tells how to set up NFS shares for secondary and (optionally) primary storage on an NFS server running on a separate node from the Management Server.
1) On the storage server, create an NFS share for secondary storage and, if you are using NFS for primary storage as well, create a second NFS share. For example:
# mkdir -p /export/primary
# mkdir -p /export/secondary
2) To configure the new directories as NFS exports, edit /etc/exports. Export the NFS share(s) with rw,async,no_root_squash,no_subtree_check. For example:
# vi /etc/exports
Insert the following line.
/export *(rw,async,no_root_squash,no_subtree_check)
3) Export the /export directory.
# exportfs -a
4)On the management server, create a mount point for secondary storage. For example:
# mkdir -p /mnt/secondary
5) Mount the secondary storage on your Management Server. Replace the example NFS server name and NFS share paths below with your own.
# mount -t nfs nfsservername:/nfs/share/secondary /mnt/secondary
Final Steps Of Cloudstack Management Server
1) Ensure that necessary services are started and set to start on boot.
# service rpcbind start
# service nfs start
# chkconfig nfs on
# chkconfig rpcbind on
2)Configure the OS and start the Management Server:
# cloudstack-setup-management
Prepare System Template:
Secondary storage must be seeded with a template that is used for CloudStack system VMs.
On the Management Server, run one or more of the following cloud-install-sys-tmplt commands to retrieve and decompress the system VM template. Run the command for each hypervisor type that you expect end users to run in this Zone.
For XenServer:
# /usr/share/cloudstack-common/scripts/storage/secondary/cloud-install-sys-tmplt -m /mnt/secondary -u http://d21ifhcun6b1t2.cloudfront.net/templates/4.2/systemvmtemplate-2013-07-12-master-xen.vhd.bz2 -h xenserver -F
You have now installed CloudStack Management Server and the database it uses to persist system data.
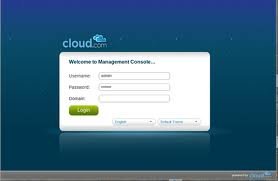
You can access management server using the url:
http://<management-server-ip-address>:8080/client
Username: admin
Password: password
XenSever Host Setup:
Installation Of XenServer:
From https://www.citrix.com/English/ss/downloads/, download the appropriate version of XenServer for your CloudStack version (see Section 8.2.1, “System Requirements for XenServerHosts”). Install it using the Citrix XenServer Installation Guide.
After installation, perform the following configuration steps,
1) Configure XenServer dom0 Memory
Configure the XenServer dom0 settings to allocate more memory to dom0. This can enable XenServer to handle larger numbers of virtual machines. We recommend 2940 MB of RAM for XenServer dom0. For instructions on how to do this, see http://support.citrix.com/article/CTX126531. The article refers to XenServer 5.6, but the same information applies to XenServer 6.0.
2) Username and Password
All XenServers in a cluster must have the same username and password as configured in CloudStack.
3)Time Synchronization
The host must be set to use NTP. All hosts in a pod must have the same time.
Install NTP.
# yum install ntp
Edit the NTP configuration file to point to your NTP server.
# vi /etc/ntp.conf
Add one or more server lines in this file with the names of the NTP servers you want to use. For example:
server 0.xenserver.pool.ntp.org
server 1.xenserver.pool.ntp.org
server 2.xenserver.pool.ntp.org
server 3.xenserver.pool.ntp.org
Restart the NTP client.
# service ntpd restart
Make sure NTP will start again upon reboot.
# chkconfig ntpd on
4) Licensing
Citrix XenServer Free version provides 30 days usage without a license. Following the 30 day trial, XenServer requires a free activation and license. You can choose to install a license now or skip this step. If you skip this step, you will need to install a license when you activate and license the XenServer.
Getting and Deploying a License
If you choose to install a license now you will need to use the XenCenter to activate and get a license.
In XenCenter, click Tools > License manager.
Select your XenServer and select Activate Free XenServer.
Request a license.
You can install the license with XenCenter or using the xe command line tool.
Cloud Infrastructure Provisioning:
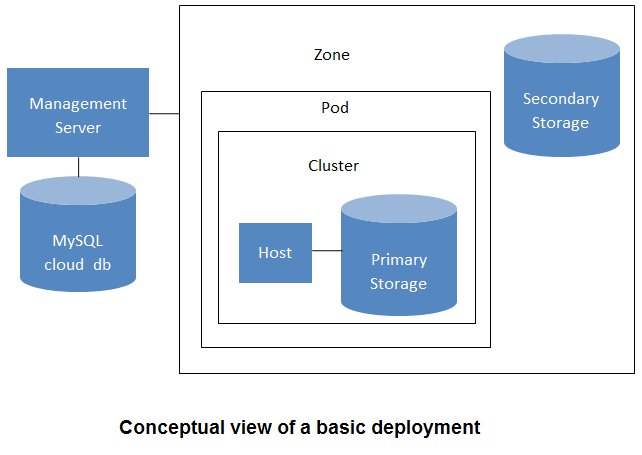
Adding A Zone:
In the left navigation tree, choose System, then Physical Resources.
a) Click on the Add Zone button in the top row of the main window. The Zone creation wizard will appear.
b) Choose the ‘Basic’ network type
c) Configure the zone
Enter the following details in the Add Zone dialog
1) Name. The name of the Zone.
DNS 1 and 2. These are DNS servers for use by guest VMs in the Zone. These DNS servers will be accessed via the public network you will add later. The public IP addresses for the Zone must have a route to the DNS server named here.
2 Internal DNS 1 and 2. These are DNS servers for use by system VMs in the Zone. These DNS servers will be accessed via the private network interface of the SystemVMs. The private IP address you provide for the Pods must have a route to the DNS server named here.
3) Public?: Should be set to yes
Adding A Pod:
Click on your newly created Zone in the left hand column and then click on the Add Pod button in the top row menu of the main window. Enter the following details in the Add Pod dialog
a) Name: the name of the pod
b) Gateway: the gateway for the hosts in that pod
c) Netmask: The netmask that encompasses the subnet in the Pod.
d)Private IP Range: This is the IP range in the private network that the CloudStack uses to manage Secondary Storage VMs and Console Proxy VMs. These IP addresses are taken from the same subnet as computing servers. You therefore need to make sure computing servers and Management Servers use IP addresses outside of this range. These two values combine to give the system control over a certain IP address range, and leave you in control of allocation for IP addresses in the CIDR but outside of the start and end range.The recommended number of private IPs per Pod is 5 times the number of Clusters. The example above allocates ten IPs as if two Clusters were in place for the Pod.
e) Guest IP Range. The range of IP addresses that will be available for allocation to guests in this Pod. For the target of this guide, these IP addresses should be in the same CIDR range as the POD CIDR.
f) Guest Netmask: The netmask in use on the subnet the guests will use.
g) Guest Gateway: The gateway that the guests should use.
Adding A Cluster:
Click on your newly added Pod in the left hand column menu, and then click on the Add Cluster button. The Add cluster dialog will appear and prompt you for the following details:
1) Hypervisor: Select the hypervisor type
2) Cluster: Enter a name for the cluster
Adding A Host:
Click on your newly-created cluster in the left hand column menu and then click on ‘Add Host’ to bring up the Add Host dialog.
Provide the following information in the Add Host dialog.
1) Cluster: This should be the newly-created cluster.
2) Host name. For Xen and KVM this is the DNS name or IP address of the XenServer host or KVM host.
3) User name. Usually the root user
The password for the above user
Adding Primary Storage:
Next you will need to tell the system about the primary and secondary storage devices that are available. If you intend to use only local disk for your installation you can skip to Secondary Storage.
In the left hand column menu, navigate to your newly created cluster. (System -> Physical Resources -> Zone -> Pod -> Cluster.) Then choose “Add Primary Storage” button from the top menu of the main window.
Provide the following information in the Add Primary Storage dialog.
1) Cluster: The Cluster for the storage device.
2) Name: The name of the storage device.
3) Protocol: Choose NFS
4) Server: The IP address or DNS name of the storage device.
5) Path: This is the exported path from the server
Tags. The comma-separated list of tags for this storage device. It should be an equivalent set or superset of the tags on your disk offerings. It is an optional field and may be left blank.
You can add multiple primary storage servers. At least one is required
Adding Secondary Storage:
You will need to add secondary storage. Secondary Storage is used to store templates, ISOs, and snapshots.
Navigate to the Zone you are building in the left hand column menu. Choose System -> Physical Resources and then click on your Zone.
a). Provide exactly one Secondary Storage device per Zone. Select “Add Secondary Storage”.
b) Provide the details for Secondary Storage server:
1) Server: The IP address of the server
2) Path. The exported path from the server.
Initialization and Testing:
You should have one Java process running CloudStack on the Management Server. This is the Management Server process.
After everything is configured CloudStack will perform its initialization. This can take 30 minutes or more depending on the speed of your network. During this initialization process several things happen:
CloudStack will start the Secondary Storage VM and Console Proxy VM from the system VM template downloaded into each Zone. In the System Section, Virtual Resources,System VMs section you will see the status of these VMs listed first as Creating, then as Starting, then as Running. You can click on Refresh is the upper right to update the status.
After the Secondary Storage VM is running the Management Server will initiate the downloads of the CentOS templates. One is downloaded for each hypervisor type. The Management Server requests that the Secondary Storage VM perform this download. You can go to the Templates tab to check the status of this download. Go to Templates then My Templates when logged in as admin. The status will show “Storage agent or storage VM disconnected” until the Secondary Storage VM is running. Then the status will change to show that the download is in progress. You can click Refresh to update the download percentages.
Once the CentOS templates are downloaded they will be uncompressed by the Secondary Storage VM. This is a large file and this operation will take several minutes. The Management Server will then update each template’s status to Ready.
If these steps do not work you should see the Troubleshooting section below, or ask for help in the forums or on IRC.
Once CloudStack has finished initializing, use the following steps to try creating a new virtual machine.
1) Click the Add Instances button and follow the steps in the wizard.
2) The template selection screen requires selecting a template. At this point you likely have only the provided CentOS template available.
3) Select a service offering. Be sure that your hardware has enough available resources or the virtual machine will fail to stop.
4) Add any additional “data disk”. This is a second volume that will be available to but not mounted in the guest. For example, in Linux on XenServer you will see /dev/xvdb in the guest.
5) Choose the primary network for the guest. You will have only one option here. You must pick exactly one.
6) Optionally give your VM a name and a group. The group is text that may be whatever you would like. Click Submit and your VM will be created and started.
If you decide to grow your deployment, you can add more Hosts, Primary Storage, Zones, Pods, and Clusters. Repeat the procedures above as needed.
Summary:
Here we have described the brief procedure of installation of cloudstack environment using XenServer hosts. In the today’s world of growing technologies its one of the most recent developments in open source cloud technologies. Only wall behing the installation is that as its open source technology there is no support provided if we face any issues we have to search forums available.
Reference:
a) http://docs.cloudstack.apache.org/projects/cloudstack-installation/en/4.6/overview/index.html


