Backup and recovery of a virtual machine can be a daunting task. Veeam Backup and replication provides an efficient way to backup, restore and replicate data across multiple storage locations. Veeam Backup and replication has moved from just a backup tool to an availability tool. It enables backup of virtual, cloud and physical server backups that make it a one-stop shop for all your backup needs. Let’s see how VMware restore with Veeam Backup and Replication can be configured.
Veeam Backup and Replication provides the following features:
- Backup of virtual, physical and cloud-based components in any operating system in one console.
- Application-aware backups and image level backups.
- Low Recovery Points Objectives are hence reducing turn-around time to restore data.
- Simplified management if backup storage with the scale-out backup repository.
- It enables fast and secure backups with an end to end encryption with Veeam Cloud Connect.
- With built-in deduplication, storage requirements are better managed.
Recovery
With Veeam Backup and replication, recovery is only made using a VeeamZIP file created during backup. Remember only a full backup file (VBK) is used for a restore.
Veeam Backup & Replication provides recovery options as follows;
- Instant VM Recovery – instantly start a Virtual Machine directly from a backup file
- Entire VM recovery – restore a VM from a backup file to its original or a different location
- VM files recovery – restore VM files separately (VMDK files, guest operating system files among other files in a VM)
- Application items recovery – During backup application-aware processing is enabled, and this allows Veeam Backup and replication to recognise any application running in the VM and thus able to recover the application when needed.
Prerequisites
- Veeam Backup and replication V 9.0
- VMware ESXi 6.0
- vCenter 6.0
Restore Data using Veeam Backup and Replication
Click on the restore wizard and select from the available restore options
Launch Restore Wizard
On the Home tab, click Restore to launch the Restore Wizard.
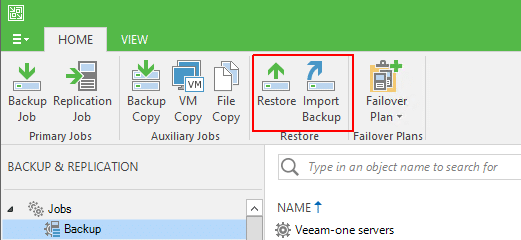
Fig 1. Restore wizard
On the Restore Wizard, on Restore from backup, select Entire VM ( including registration )
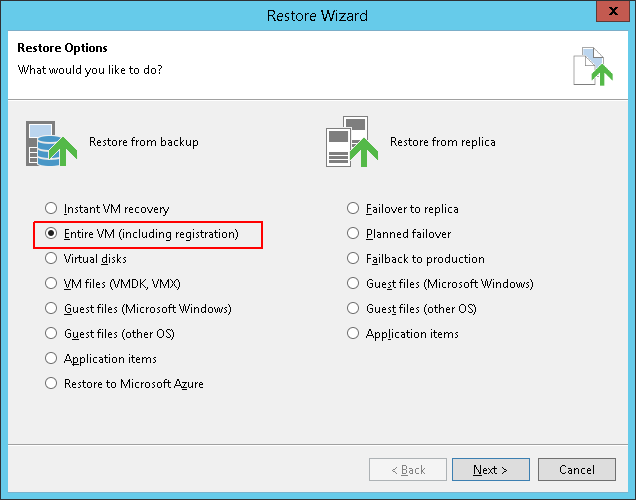
Fig 2. Restore Options
Add a VM to restore
At the Virtual Machines select the VM(s) that you want to restore. To select VM(s), Click Add VM. Select From Backup
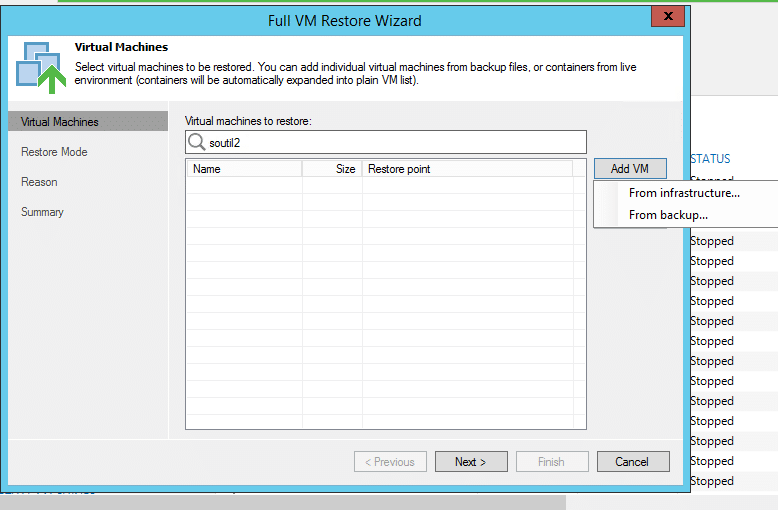
Fig 3. Virtual Machines
Enter the name of the VM the search field. Select the VM from the displayed list. Click Add.
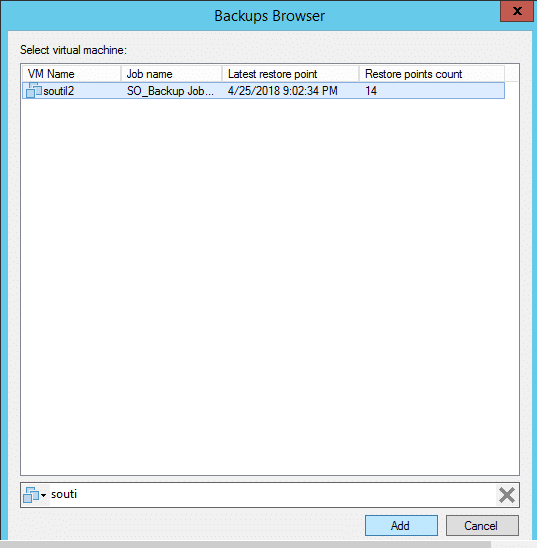
Fig 4. Browse VM
Select Restore Point
Select the VM. (To be restored). Click Point on the right. From Restore Points window, select a restore point required for the VM.
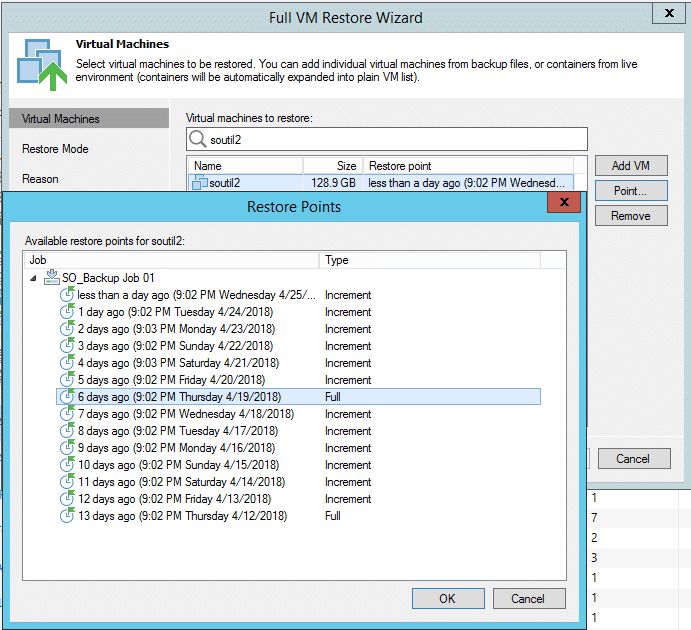
Fig 5. Restore points
Restore Mode
Restore to original location
Select Restore to the original location if original settings of the VM are required.
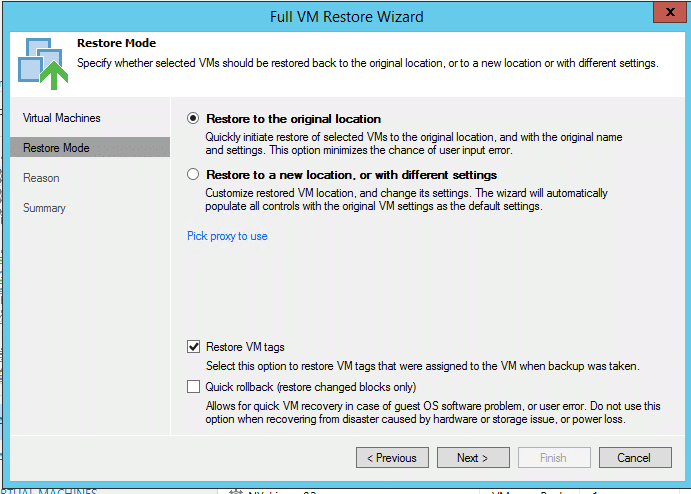
Fig 6. Restore Mode
Note: The original VM is deleted during restore to the original location.
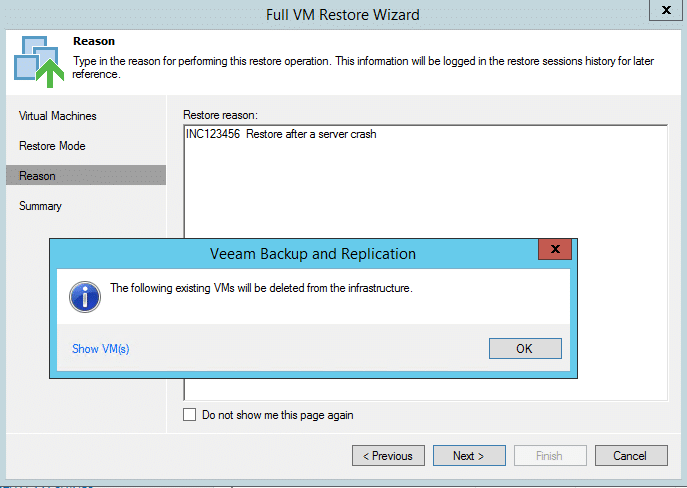
Fig 7. Notification – Deletion of Original VM
At the Reason, enter a reason for restoring the selected VMs. The information is saved in the session history, and you can reference it later.
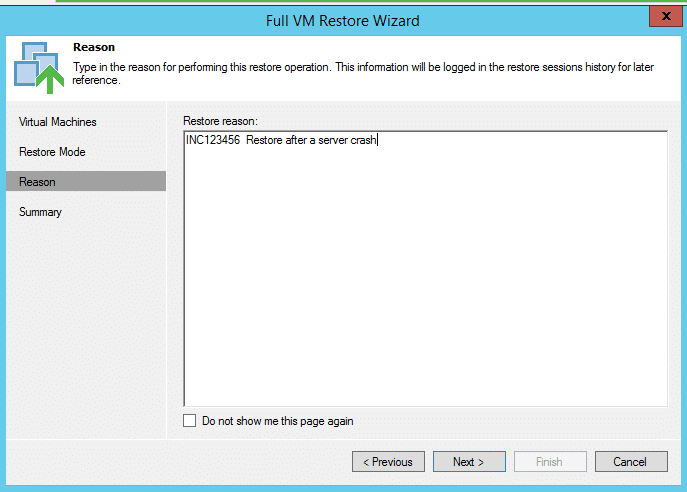
Fig 8. Reason for the restore
At the Summary, verify the settings for the restore and review as needed. To start the restored VM on the target host, check Power on VM after restoring. Click Finish to restore the VM.
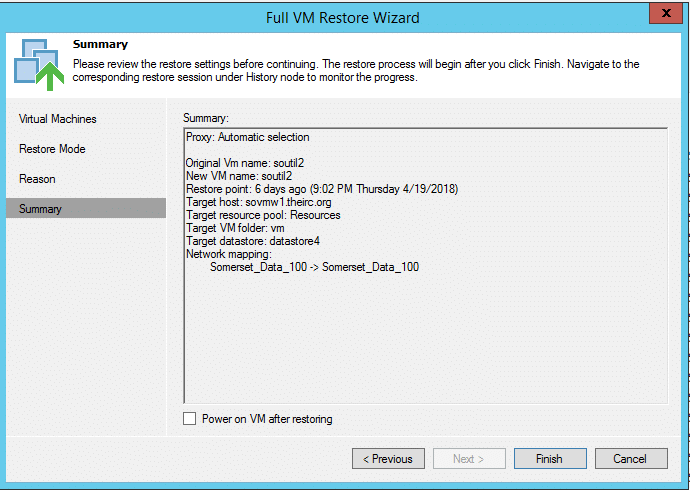
Fig 9. Summary of VM Restore
Restore to new location
Select Restore to a new location, or with different settings (e.g. VM location, network settings, disk format etc.). Select the Restore VM tags checkbox then click Next.
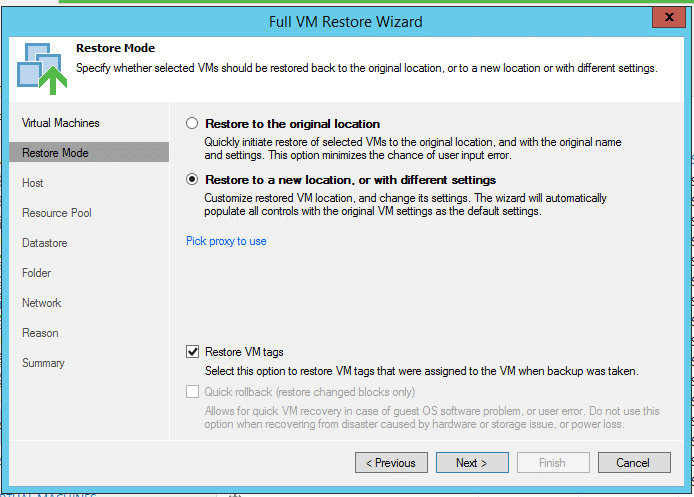
Fig 10. Restore to a New Location
Select the VM and Click Host. A list of hosts is displayed. Select accordingly.
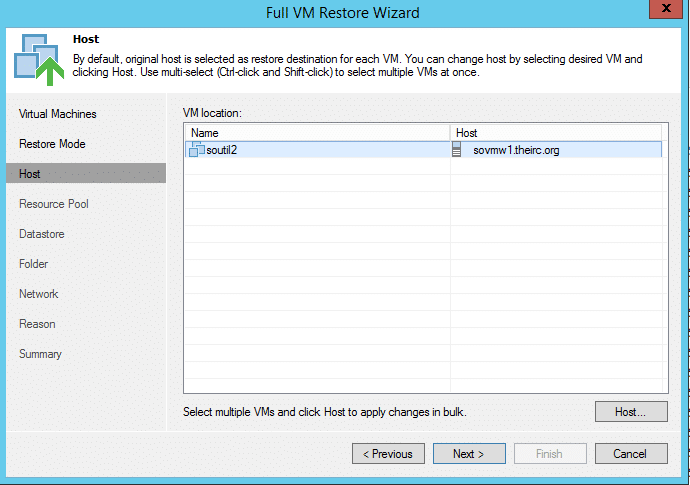
Fig 11. Host details
Choose a host or cluster where the VM will be restored.
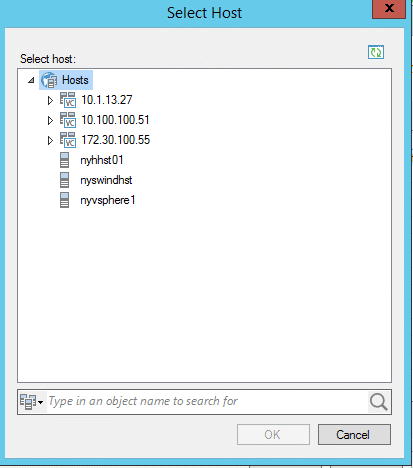
Fig 12. Select Host
Select Target Resource Pool
To specify a destination resource pool, Select a VM and click Resource Pool where the VM(s) will be placed.
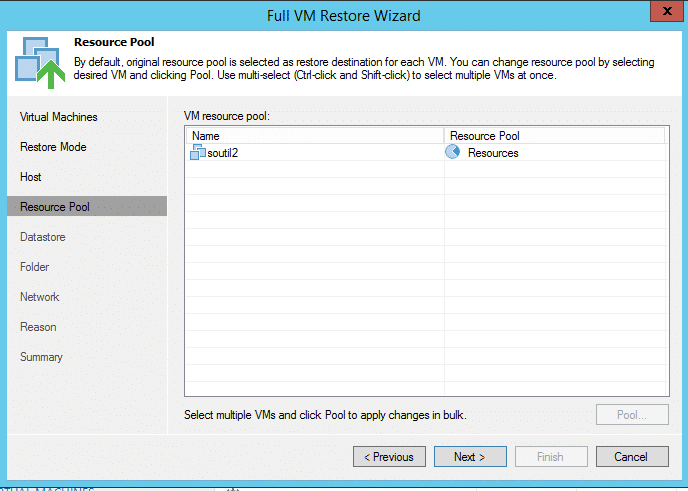
Fig 13. Resource pool
Select Target Datastore
To specify a destination datastore, Select a VM and click Datastore.
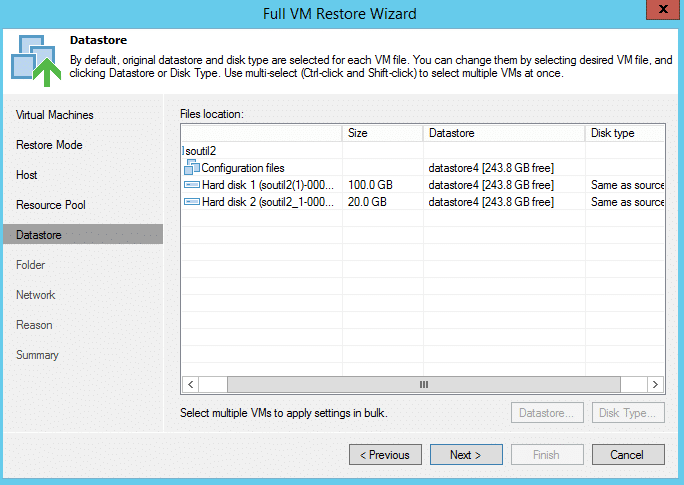
Fig 14. Datastore location
By default, Veeam preserves original restored VM disks settings. To change the disk format of the restored VM, select the VM. Click Disk Type. In the Disk Type Settings, choose the format to be used in restore virtual disks of the VM.
Target Folder and Change VM Names
Click Folder and choose a folder where the VM will be placed.
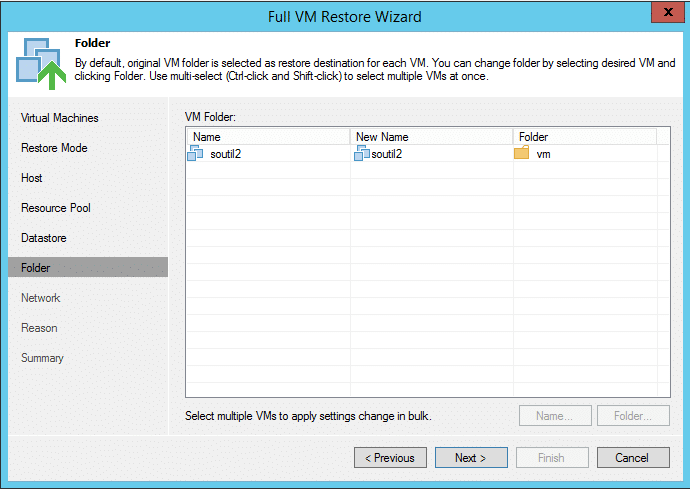
Fig 15. Folder
By default, Veeam restores a VM with its original name. However, this can be changed. To change the VM name, click on Name. In the Change Name window, enter a new name and or add a prefix to the original VM name.
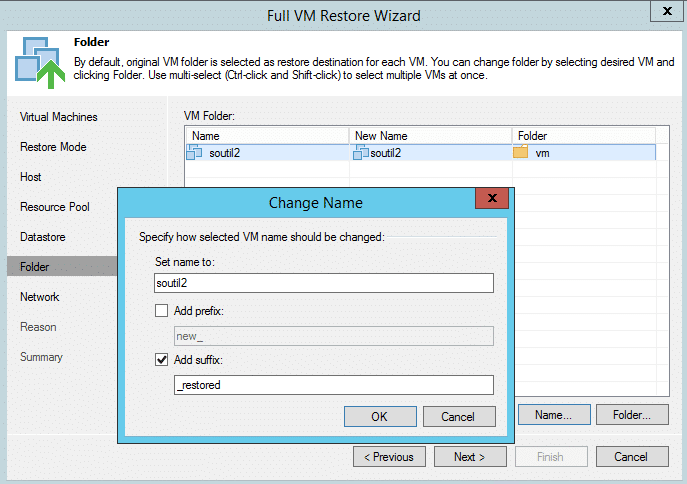
Fig 16. Name of the folder
Specify Network Mapping
Click on Network. Choose the source and target network
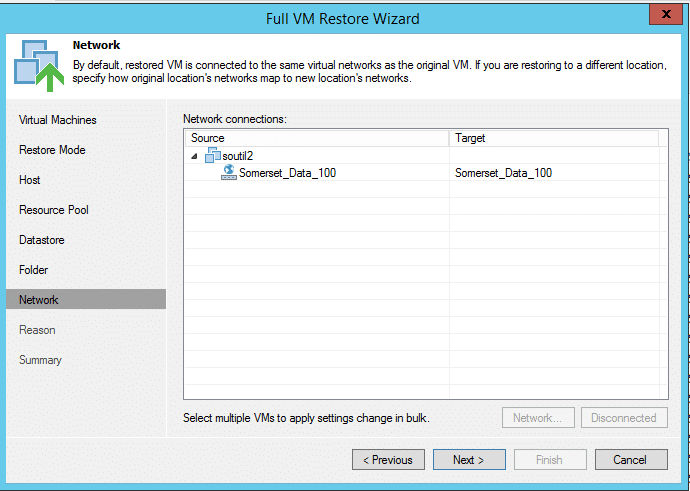
Fig 17. Network details
Select Disconnected if no connection is required to the restored VM.
Specify Restore Reason
At the Reason, enter a reason for restoring the selected VMs. The information is saved in the session history, and you can reference it later.
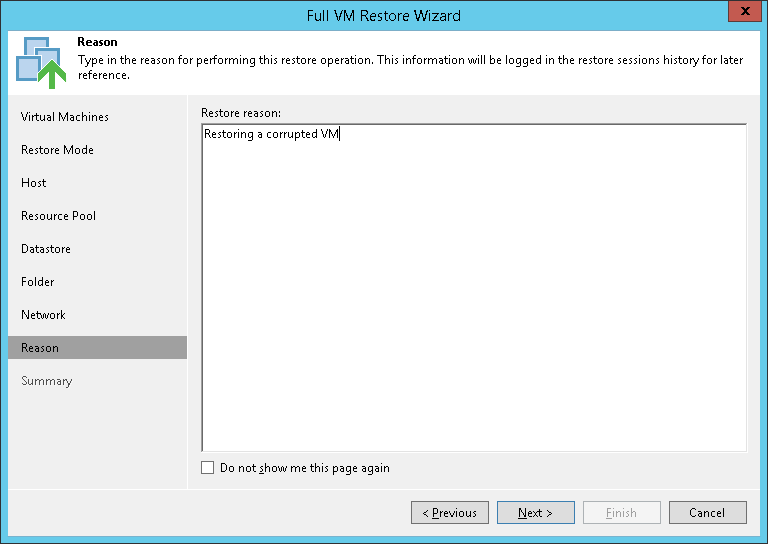
Fig 18. Reason for the restore
At the Summary, verify the settings for the restore and review as needed. To start the restored VM on the target host, Check Power on VM after restoring. Click Finish to restore the VM.
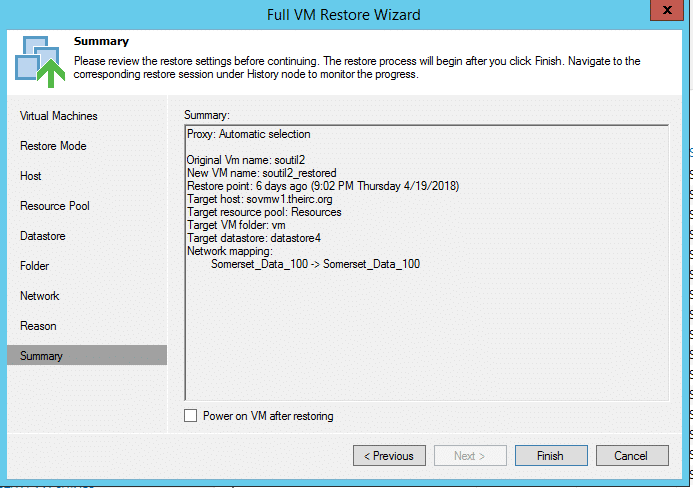
Fig 19. Summary of VM restore
Conclusion
Click the edit button to change this text. Veeam architecture allows rapid data recovery and provides customisation options for recovery only what is needed; it could be VMDK files or application files of guest operating system files. The speed of recovery and streamlined recovery process makes Veeam a great tool in protecting organisational data.
Veeam is an innovative backup technology that surpasses the traditional needs of disaster recovery by providing guaranteed recoverability for your company’s most sensitive and valuable data asset
Xieles Support can help you with the installation of any Cloud Computing or Cloud Hosting environments and related tools. Get a quote from us if you need any assistance.


