Migrating a 500 GB dedicated cPanel server within 30 Minutes! Do you think it’s possible folks? Yeah, Acronis can do this for you, Let’s see how we can do that.
For doing the migration you need
1. Acronis backup solution
2. VMware vCloud
Firstly I would like to share few benefits of Acronis, Acronis is a third-party storage solution it’s used for taking snapshots of your VM’s and also dedicated servers. I believe you already linked your server with Acronis backup storage with its agent, so no more waiting, Let’s get into it. Before doing the migration you need to make sure about few things.
1. Disk mapping of the server.
2. Total Disk Space
3. Ram
4. CPU Cores
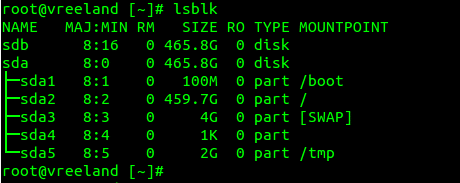
To see the Disk mapping type the following command on your dedicated server.

Here we have sda and sdb
To see Disk space and mount points type the following command.
Here we have 500 GB disk with 4 mount points, It might be different on your server
To see the Ram and CPU core type the following command
Here we have 8 GB RAM with CPU core 4.
Now, We are going to create an empty VM on the VMware vCloud with the same configuration.
Login to your VMware vCloud console,
Go to MyCloud >> Build a new App
Here you can type any name for your vAPP. On the next window you need to create a new virtual machine.
By default you have some public catalogs that contains some OS. Here we need a fresh VM so you have to click on New virtual machine
In the next window, you can see
Configure resources, here you can allocate your resource types like SSD or HDD. I chose SSD, which is faster than HDD.
Configure virtual machine
In this part you should provide the computer name for your VM, Network type should be internal,
You should always use DHCP when creating VM. In this tutorial, I have created my first VM so I have used static Network with internal IP 10.0.0.7.
Once you click Finish you could see your VM is creating and it will take around 2 to 3 minutes.
Now our VM is ready on the Vmware vCloud.
To restore the backup.
Step1. Login to your Acronis backup solution
Devices >> All devices >> in the recovery part you could see download ISO, Download that ISO
Once your iso downloaded, You need to upload it to your VMware vCloud Catalogs list.
Upload the ISO
Login to your VMware vCloud
In the Catalogs section you can upload the ISO, I have already upload the ISO named acronis.iso.
This iso is used for correcting the disk mapping of the server with new VM.
Now we can start the restoration.
We need to attach the iso with the vitual disk.
Go to the VM section >> select your VM >> Click the on the virtual media, then it will show you the images under your catalogues like this.
I have inserted the acronis.iso to the new VM that we have created, then power on the VM.
Open the VM’s console, then you could see the screen like this.. choose the recovery mode then continue.
On the next window, you can see recover data from earlier created backup.
On the next screen, you can see an option to log in to your Acronis storage solution.
Enter your Acronis backup solution’s login credentials, It will take you to the recovery points that we have on the Acronis storage.
Select any recovery points you wish to restore. Please make sure that you have selected all the Volumes like sda1, sad2, sda3.
You can see the Volumes lists on the bottom part, under Backup contents (Volumes).
Once you selected all volumes then click OK to continue for start recovery, It will take around 20 to 30 minutes.
Once the restoration is completed you can see the Succeeded.
Now click on reboot.
Then it will ask for the login details, Type your old servers username (root ) & password.
Network configuration
This part is most challenging, for beginners it would not be easy.
In the Vmware we are using Internal IP’s and Edge Gateways, We need to NAT the internal IP with public IP.
Here I will tell you how to do DNAT
Check your internal IP. You can see it on your VMware console (Right side in the VM).
In my case, I have allocated two internal IP 10.0.0.7 and 10.0.0.11. so I’m going to use
10.0.0.7
Go to /etc/sysconfig/network-scripts/
Make sure your Device name it may be different on your VM
We need only one Device to configure the internal network. so remove all unnecessary device like eth1 and eth2
In our case Device name is eth2.
# cd /etc/sysconfig/network-scripts
# vim /etc/sysconfig/network-scripts/ifcfg-eth2
DEVICE=”eth2″
BOOTPROTO=”static”
DNS1=”8.8.8.8″
DNS2=”8.8.4.4″
GATEWAY=”10.0.0.254 ”
IPADDR=”10.0.0.7″
IPV6INIT=”no”
MTU=”1500″
NETMASK=”255.255.255.0″
NM_CONTROLLED=”yes”
ONBOOT=”yes”
TYPE=”Ethernet”
save the file & execute the following command
ifup eth2
service network restart
NAT the internal IP with Public IP
Here we have the Internal IP 10.0.0.7 for the VM, to DNAT the IP
GO to vCloud >> Administration >> Org VDC Networks >> Internal (Right click) >> Configure Services
To NAT the IP
Go to NAT section.
Here I’m using the 5.79.103.130 for 10.0.0.7, The IP will different based on your network.
To Add DNAT >> Click on DNAT then add the following information.
Original IP Range: Your public IP (eg; 5.89.xxx.xxx)
Protocol: TCP
Original Port: any
Translated IP / Range : Your internal IP (10.0.0.7 )
Translated Port: any
click Ok. Now your internal IP is DNAT with public IP. Now you can access your VM using the public IP.
Click edit button to change this text.
STILL SPENDING TIME ON SUPPORT?
Outsource your helpdesk support to save time and money. We have technicians available for little over 5 USD per hour in order to assist your customers with their technical questions. Grow your business and concentrate more on your SALES!
Xieles Support is a provider of reliable and affordable internet services, consisting of Outsourced 24×7 Technical Support, Remote Server Administration, Server Security, Linux Server Management, Windows Server Management and Helpdesk Management to Web Hosting companies, Data centers and ISPs around the world. We are experts in Linux and Windows Server Administration, Advanced Server Security, Server Security Hardening. Our primary focus is on absolute client satisfaction through sustainable pricing, proactively managed services, investment in hosting infrastructure and renowned customer support.
Conclusion
The restoration is very fast and easier when we use Acronis backup solution and VMware vCloud. But Acronis storage is a little bit costlier and the main advantage is the security of the data. We can backup entire server on the Acronis & also restore to a fresh VM (Vmware vCloud) within few minutes if there is any disaster occurs on the production server.
